Sunday, February 28, 2010

Flavor-of-the-Month: Black Bean Brownies


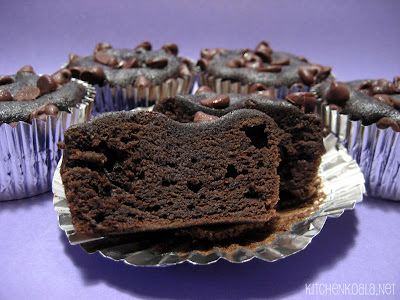
That's right.  Black Bean.  Brownies.  Now before you scurry off, hear me out:  these puppies are goooood.  Surprisingly light and meltingly tender good. These don't really qualify as 'health food,' but they are a much healthier alternative to your standard brownie.  With black bean puree filling in for flour and a mere 3 Tablespoons of oil (and olive oil, at that), these gluten-free delights are simple to prepare and taste nothing like beans.  So go ahead, indulge a little.  Just don't tell anyone their secret ingredient.  ;)

I found the recipe on SnoWhite's Finding Joy in My Kitchen blog and simply baked them up in foil cupcake liners for easy serving and freezing.  These Black Bean Brownies are my entry for February's Flavor-of-the-Month: Chocolate event, hosted by Bridget of Bake at 350.  This event will be the last official Flavor-of-the-Month link-up, but Bridget promises there will still be recipe link-ups here and there--just not every month.  I'll be looking forward to those events, as I have been with all the Flavor-of-the-Month round-ups!  I've discovered so many talented bloggers through these round-ups, and my ever-growing "to-read" list shows it!  Be sure to check out the recipe link-up HERE.


Black Bean Brownies (Makes an 8" square pan or 12 muffin size)
From SnoWhite of Finding Joy in My Kitchen

1 can (15.5 oz) can black beans, drained and rinsed
3 eggs
3 Tbl. olive oil
¼ cup cocoa powder (I used King Arthur Double Dutch Dark Cocoa)
pinch of salt
½ tsp. baking powder
1 tsp. vanilla
¾ cup white sugar
½ cup chocolate chips
I also added ½ tsp. espresso powder

Preheat oven to 350°F.  Lightly grease an 8" baking pan with non-stick spray, or line 12 wells of a muffin tin with foil liners.  

Place the well-rinsed and drained black beans into a blender.  Add eggs and olive oil to blender, then puree until smooth.  You may need to stop the blender and scrape a few times.  There will be some fragments of black bean skins still in the puree, but they won't be noticeable once the brownies are baked.  Add remaining ingredients EXCEPT chocolate chips to blender.  Pulse a few times to get things started, then continue to blend until smooth, stopping to scrape down sides of blender as needed.

Pour batter into prepared baking pan or divide among the 12 prepared muffin cups.  Sprinkle with chocolate chips.  Bake 8" pan for about 30 minutes, or the brownie muffins for about 20-22 minutes.  Brownies will start to pull away from the edge of the pan when they are done.  (Mine were a bit underbaked at 20 minutes, hence the slight sinking.  There were still plenty good, and not raw by any means.)  Brownies will be quite tender and moist, so refrigerate or freeze after a day or so--they won't keep long on the counter (but don't count on them lasting very long anyway!  They WILL get eaten.)

Friday, February 26, 2010

Meatless Fridays: Italian Pasta Salad


For today's edition of Meatless Fridays, I'm bringing you a pasta salad that's so easy a _____ could do it.  (Sorry, GEICO®.  I don't mean to steal.)  As you can see from the photo below, it's more 'goodies' than pasta, making it less carb-heavy than most pasta salads.  This may be served as a starter, side, or main dish.  Garbanzo beans (aka chickpeas) or cannellini beans would be great protein additions for a heartier salad. 


Italian Pasta Salad  (Serves 4)

4 oz. mini bow tie pasta
8 oz. broccoli florets, cooked (I used frozen)
½ pint grape or cherry tomatoes
2.5 oz. jar sliced mushrooms, drained
2.5 oz. can sliced olives, drained
4 oz. mozzarella cheese, diced
4-6 Tbl. Italian dressing
salt & pepper, if needed

Cook pasta according to package directions; drain and rinse under cold water.  In a medium bowl, combine all ingredients and toss to combine (start with 4 Tbl. dressing and add more if necessary).  Cover and allow to sit for 1 hour for flavors to combine.  Refrigerate leftovers.

Wednesday, February 24, 2010

Chicken Pot Pie


Sure, you could go out and buy one of those handy-dandy frozen chicken pot pies for a whopping 85 cents.  But where's the fun in that?  And you've got to ask yourself...what exactly is in those things anyway, if they're able to sell for so cheap?  My guess is, you don't wanna know.  And neither do I, because I used to be their #1 fan.  In my poor college student days, chicken pot pies were a staple of my diet, as were the turkey pot pies.  The beef ones?  Not so much.  Healthy?  No.  Cheap?  For sure.  Now that I'm older (and hopefully wiser!) and can afford to prepare my own pot pies, I can say goodbye to those little blue (or was it red?) boxes!

Try out this great Chicken Pot Pie recipe I found on Sunday Baker (via Mommy's Kitchen), and you'll be hooked.  I'm not normally a fan of pie crust, but man oh man...this one is made with cream cheese and it's mighty good!  And bonus!  It makes three small pies instead of one standard pie-sized pie!  Customize your pies with your favorite veggies; I used potatoes and a frozen veggie blend I mix up myself (1 lb. each frozen chopped broccoli, diced carrots, peas, and corn--mix in large bowl and store in two 1-gallon freezer bags).  The recipe calls for a whole cooked, deboned chicken...but I only used about a cup since I added potatoes.

Be forewarned:  these pies may bake up in individual pans, but unless you're REALLY hungry, plan on getting two servings out of each pie. 

Monday, February 22, 2010

My Girl, Paula: Hawaiian Chik'n Salad


This week's My Girl, Paula! theme is FRUIT, which gave me the perfect opportunity to try out a recipe I've had bookmarked in my copy of The Lady & Sons, Too! for a while now: Hawaiian Chicken Salad.  With grapes, oranges, and pineapple, this fresh and crunchy salad is a welcome departure from the heavy stews and comforting foods of winter.  I halved the recipe and swapped out light mayo for regular, as well as a package of Morningstar Farms® Chik'n Strips for "real" chicken.  This stellar recipe would be fantastic with leftover grilled or rotisserie chicken too!  Plan on preparing and eating this within a day or so, because the mayo will break down and get watery (from all that fruit!) as the salad sits in the fridge.


Hawaiian Chik'n Salad  (Serves 4-5)
Adapted from The Lady & Sons, Too!

8 0z. pkg Morningstar Farms® Chik'n Strips (or 2 cups cooked diced chicken)
½ cup mayonnaise (I used light mayo)
½ cup sliced almonds
1 cup diced celery
½ pound grapes, sliced in half
11 oz. can mandarin oranges, drained
8 oz. can pineapple tidbits, drained

Prepare Chik'n Strips according to package directions for salads, then chill and dice.  In a mixing bowl, combine diced chik'n (or chicken, if using), mayonnaise, almonds, and celery until well combined.  Fold in grapes, mandarin oranges, and pineapple.  Serve as a salad or use to fill sandwiches (croissants would be most excellent!).

Friday, February 19, 2010

Meatless Fridays: Fried Rice


Now that all the excitement of Valentine's Day/Chinese New Year/President's Day/Mardi Gras/Olympics has died down (okay, not the Olympics--they're still going on), I'd like to introduce a new feature I'm running during the Lenten season: Meatless Fridays.  Every Friday from today through Good Friday, I'll be bringing you a vegetarian dish even your heartiest carnivores will enjoy. Regular readers will surely notice the steep decline in the number of sweets-related posts during Lent, as I shift my focus away from indulgence.  But don't worry--I have something planned for St. Patrick's Day, and there might be an ice cream post sprinkled in there somewhere during the next 40 days...


On today's menu:  Fried rice.  It's quick to throw together, but you'll have to do a little planning ahead, as the rice will need to be cooked and thoroughly chilled before starting. (You can do this the night before, or use leftover rice)  Change it up by using your favorite mix of veggies, or go vegan and omit the eggs--it's really difficult to mess this one up!  Normally I add ingredients and taste as I go, but this time I stopped and measured...just for you  :)  Enjoy!


Fried Rice  (Serves 6)

3 Tbl. oil, divided use
2 eggs, lightly beaten
2 cups frozen mixed vegetables, thawed in microwave
4½ cups cold, cooked rice (from 1½ cups raw)
¼ cup soy sauce (I used Kikkoman®) 
1 tsp. garlic powder
1 tsp. onion powder
½ tsp. black pepper

In a large (12") skillet or wok, heat 1 Tablespoon oil over medium-high heat.  Add beaten eggs and cook, stirring frequently, until eggs are cooked (basically you're going for very small scrambled eggs here).  Add mixed vegetables and allow to heat through.  Remove eggs and vegetables from pan and reserve.  

Add remaining 2 Tablespoons oil to pan set over medium-high heat.  Add cold rice to pan, stirring frequently and breaking up large clumps of rice.  You'll hear lots of sizzlin' going on.  Cook rice over medium-high heat for several minutes, until thoroughly heated and "fried."  Add soy sauce, garlic powder, onion powder, and black pepper to rice.  Stir and cook until evenly distributed.  Add eggs and vegetables back into pan, and mix until combined and heated through.

Monday, February 15, 2010

Valentine's Exchange, Part IV


It's good to be back home!  I spent the last four days with my parents, dealing with a family situation, so I didn't open my Valentine's Day Exchange package from my partner (Liza of The Smiths) until I got home last night.  She made me such sweet lovelies; I'm super thrilled!  :)  Pictured above: a reversible hot pad, hand towels, and an adorably feminine cherry print apron (with a pocket!).  The whole set is very Mary Engelbreit.  I love it!  Can't wait to get back in the kitchen to tie on my new apron and whip up some goodies!

Thursday, February 11, 2010

Valentine's Exchange, Part III

Domestic Dork

Today I'm bringing you the final recipe for cookies I included in my Valentine's Day Exchange package.  The event was hosted by Holly Noelle of Domestic Dork.  I had so much fun selecting, baking, and packaging recipes for my bloggy exchange partner, Liza of The Smiths.  This was my first but certainly not my last blog exchange :) 

Aside from the standard box of chocolates, no candy signals the start of the Valentine's Day shopping season better than Conversation Hearts--those tiny multicolored hearts with messages on them.  Love 'em or hate 'em, you can't deny they're pretty much the ultimate in Valentine-ness.  I recreated them in cookie form with sugar cookies, glaze, and Wilton® Food Writer pens.  My penmanship with a decorating bag is poor at best, so these pens were a lifesaver! :)  This was certainly not my original idea, but they were simple and too cute not to try.  I'm very pleased with the results, so these cookies will definitely make it into my rotation!

I'm also entering this recipe in the All Through the Year Cheer: Valentine's Day event, hosted by Brandy of Nutmeg Nanny.  The full round-up and winner will be posted on Valentine's Day, so be sure to check out the All Through the Year Cheer site.  If you're interested in joining in on the fun, it's not too late--recipe submissions will be accepted until 9 pm EST on February 13th (tomorrow!).


White Chocolate Almond Sugar Cookies
From Karen's Cookies

2¼ cup all-purpose flour
1 tsp. baking powder
¼ tsp. salt
½ cup butter, softened
cup sugar
1 egg
1 tsp. vanilla extract
½ tsp. almond extract
6 oz. white chocolate

Preheat oven to 350°F.  In small saucepan over low heat, melt the white chocolate and set aside.  In small bowl, whisk together the flour, baking powder and salt (so they're well combined) and set aside.

In large mixer bowl beat butter and sugar until creamy.  Blend in egg and vanilla extract.  Beat in melted white chocolate.  Gradually beat in flour mixture until soft dough formss.  Shape dough in ball; flatten to ¾" thickness.  Wrap in plastic wrap; refrigerate 15 minutes* until firm.

On lightly floured surface, roll out dough to desired thickness (I roll ¼" thick).  Bake until edges are golden (8-12 minutes--depending on size and thickness).  Let stand 2 minutes.  Remove from cookie sheets and cool completely.

*Note: You MUST be able to roll and cut the dough after the 15 minute refrigeration time, or it will set up too much and won't roll out well.  This dough is a dream to work with.  You'll love it.


Cookie Glaze

2 cups powdered sugar, sifted
2 Tbl. almond milk
½ tsp. vanilla extract
¼ tsp. almond extract
2 Tbl. corn syrup
Food coloring, as desired

Combine powdered sugar and almond milk in a bowl, stirring until smooth.  Blend in extracts, then stir in corn syrup.  Divide glaze among small bowls to add coloring.  Cover bowls and allow to sit for about 15 minutes for bubbles to rise to the surface.  Before using glaze, gently stir out bubbles.  Spread over cookies with an offset spatula.  Glaze will dry to a firm, stackable finish.

Valentine's Exchange, Part II

Domestic Dork
 Here are the next two recipes for the Valentine's Day Blog Exchange I participated in.  Read more about the exchange at Domestic Dork and HERE at my previous post.

Double Chocolate Walnut Brownie Hearts (makes 12) 
Adapted from King Arthur Flour

½ cup unsalted butter
1 cup + 2 Tbl. sugar
2 large eggs
½ cup + 2 Tbl. Dutch-process cocoa
½ tsp. salt
½ tsp. baking powder
½ tsp. espresso powder, optional
1½ tsp. vanilla extract
¾ cup King Arthur Unbleached All-Purpose Flour
½ cup chopped walnuts, toasted
½ cup semisweet chocolate chips

In a saucepan set over low heat, melt the butter, then add the sugar and stir to combine.  Return the mixture to the heat briefly, just until it's hot (about 110°F to 120°F), but not bubbling; it'll become shiny looking as you stir it.  Heating this mixture a second time will dissolve more of the sugar, which will yield a shiny top crust on your brownies.

While the sugar heats a second time, crack 2 eggs into a bowl, and beat them with the cocoa, salt, baking powder, espresso powder, and vanilla until smooth.

Add the hot butter/sugar mixture, stirring until smooth.

Add the flour and walnuts, again stirring until smooth.  Set batter aside to cool slightly before adding the chocolate chips.

Meanwhile, preheat oven to 350°F.  Lightly grease 12 heart-shaped foil pans with non-stick spray and set them on a baking sheet.

Once oven is preheated and batter has cooled down, stir in chocolate chips.  Portion batter into the prepared pans.  Bake in 350°F oven for 15-20 minutes, until a cake tester inserted into the center comes out clean, or with just a few moist crumbs clinging to it.  The brownies should feel set on the edges, and the center should look very moist, but not uncooked.  Remove them from the oven and cool on a rack before packaging or serving.

*  *  *  *  *  *  *  *  *  *  *  *  *  *  * 

Blueberry Macadamia White Brownie Hearts (makes 11)
Adapted from Ann Clark

½ cup unsalted butter
5 oz. white chocolate, chopped
cup + ¼ cup sugar (amount is wonky because this is  the original recipe)
2 eggs
1 tsp. vanilla extract
¼ tsp. salt
1 cup all-purpose flour
¼ cup macadamia nuts, chopped
¼ cup dried blueberries
1 oz. white chocolate, for drizzle

Preheat oven to 325°F.  Lightly grease 11 heart-shaped foil pans with non-stick spray and set them on a baking sheet.

Melt butter in a medium saucepan over low heat.  Add 5 oz. chopped white chocolate and stir until melted.  Remove from heat, let cool slightly, then stir in sugar, eggs, vanilla extract, and salt.  Stir in flour just until smooth.  Fold in macadamia nuts and dried blueberries.

Portion into prepared pans.  Bake in 325°F oven for 20-25 minutes, until tops are golden and just firm to the touch.  Remove from oven and cool completely on a rack.  Brownies may sink slightly while cooling. 

Melt 1 oz. white chocolate in a disposable decorating bag.  Snip a small corner off the bag, then drizzle melted white chocolate over cooled brownies.  Let set before packaging.

Domestic Dork's Valentine's Day Blog Exchange

Domestic Dork

Two months ago, I joined up with SITS--a comment, support, and networking community for women bloggers.  Through SITS, I've been exposed to so many wonderful bloggers, one of whom was a recent Featured Blogger.  Her name is Holly Noelle and she's the mastermind behind the Domestic Dork blog.  When I visited her blog through the link on SITS, I learned she was hosting a Valentine's Day Blog Exchange--which I promptly signed up for.  There weren't any hard and fast rules, just that the items should be handmade if possible.  I was partnered up with the lovely Liza of The Smiths, and I set off to brainstorm on what to include in her package.  Here's what I came up with:


Believe me, it wasn't easy to narrow down what I wanted to send...which is probably why I settled on a selection of FIVE chocolate-themed goodies.  I wanted her package to contain a "Best of Kitchen Koala" selection--something to represent some of my best and favorite recipes:
 Mexican Hot Chocolate Snickerdoodles (vegan)
 White Chocolate Cherry Cookies
 Double Chocolate Walnut Brownies
 Blueberry Macadamia White Brownies
 White Chocolate Almond Sugar Cookies
Liza e-mailed me last night to let me know she received her goodies; I'm glad it arrived on time and in one piece!  I hope she and her husband have a wonderful time sampling everything I sent, as well as a lovely Valentine's Day!  :)  Her husband is a chef, so I was more than a little intimidated to send food items for the exchange.  I almost considered sending a knit or crochet project, but since baking is what I do best I had to calm my nerves and stick with it! 

Because I have five recipes to share, I'll be posting them in installments.  Here are the first two:


Mexican Hot Chocolate Snickerdoodles (Yields 2 dozen)
From Vegan Cookies Invade Your Cookie Jar

For the topping:
cup sugar
1 tsp. ground cinnamon

For the cookies:
½ cup canola oil
1 cup sugar
¼ cup pure maple syrup
3 Tbl. almond milk (or your preferred non-dairy milk)
1 tsp. vanilla extract
1 tsp. chocolate extract (didn't have this; used ½ tsp. vanilla extract instead)
1 cups all-purpose flour
½ cup cocoa powder (used half regular, half Hershey's Special Dark®)
1 tsp. baking soda
¼ tsp. salt
½ tsp. cinnamon
½ tsp. cayenne

Preheat oven to 350°F.  Line 2 large baking sheets with parchment paper.

Mix the topping ingredients together on a flat plate.  Set aside.

In a medium mixing bowl, use a fork to vigorously mix together oil, sugar, maple syrup, and almond milk.  Mix in extract(s).

Sift in remaining ingredients, stirring as you add them.  Once all ingredients are added mix until you've got a pliable dough.

Roll dough into walnut-sized balls.  Pat into the sugar topping to flatten into roughly 2-inch discs.  Transfer to baking sheet, sugar side up, at least 2 inches apart (they do spread).  This should be easy as the bottom of the cookies should just stick to your fingers so you can just flip them over onto the baking sheet.  Bake for 10-12 minutes, they should be a bit spread and crackly on top.  Remove from oven and let cool for 5 minutes, then transfer to a cooling rack to cool completely.

*  *  *  *  *  *  *  *  *  *  *  *  *  *  *

White Chocolate Cherry Cookies  (Yields 3 dozen)
Adapted from Allrecipes

1 cup butter, softened
¾ cup packed light brown sugar
¼ cup white sugar
3.4 oz. pkg. white chocolate instant pudding mix
2 eggs
2 tsp. vanilla extract
1 tsp. baking soda
2¼ cups all-purpose flour
6 oz. dried tart cherries, coarsely chopped
6 oz. white chocolate, chopped

Preheat oven to 350°F. 

In a large bowl, cream together the butter, brown sugar, and white sugar.  Beat in the instant pudding mix until blended.  Stir in the eggs and vanilla.  Blend in baking soda, then graudally add flour.  Finally, stir in the chopped cherries and white chocolate chunks.  Drop cookies by rounded spoonfuls onto ungreased cookie sheets.

Bake for 10-12 minutes in the preheated oven.  Edges should be golden brown.

Tuesday, February 9, 2010

Pepperoni Breadsticks and an Award


Pepperoni Breadsticks: fast, fun, and a real kid-pleaser.  I was tempted to write "cleaner than pizza"...until I remembered how ungraceful I am with foods dipped in sauce.  My light-colored shirts are sauce magnets!  Hopefully you and your kiddos can manage to keep yours clean, or do what I've recently learned to do when eating spaghetti or pizza: wear a red shirt  :)  Anyone else out there a messy eater?


Pepperoni Breadsticks (makes 10)

1 can refrigerated pizza dough
10 sticks smoked mozzarella string cheese*
1 pkg. turkey pepperoni (you'll need 80 slices or so)
Marinara sauce for dipping

Preheat oven to 400°F.  Line a large cookie sheet with foil and lighty grease with non-stick spray.

Unroll pizza dough onto a work surface, and cut into 10 pieces.  Working one at a time, gently pat and stretch dough into about 4" x 5½" rectangles.  Exact size doesn't matter here--just aim for a size big enough to roll a stick of string cheese in.  Lay about 8 slices of pepperoni down the length of the dough rectangle, overlapping to fit.  Place string cheese on top, then roll dough up to cover filling.  Pinch seams and both ends, making sure to get a good seal.  Place on baking sheet and repeat with remaining dough and fillings.

Bake in preheated 400°F oven for 12-15 minutes, or until breadsticks are lightly golden.  Cool 2 minutes on baking sheet, then serve with sauce for dipping.

* I found smoked string cheese in the "fancy cheeses" display near the deli.  Mine came in a vacuum-packed bundle of 16, so no individual wrappers to fool with! 


I recently received the Beautiful Blogger Award from Lady Bubble Pop World of Joy of The CopyCat BlogThank you!  Don't you just love her name?  It's so fun and definitely memorable.  If you're into makeup, you'll love her blog--she recreates gorgeous makeup looks and posts for us to see!  The blog is fairly new (oldest post I could find is from January 2010), but I'm certain she'll have a great future in the blogging world--she received her first award very early on!  Won't you pay her a visit and welcome Lady Bubble Pop World of Joy to the blogging community? :)


Instructions for the award:
1. Thank the person who gave you the award.
2. Paste the award on your blog

3. Link the person who nominated you for the award
4. Tell 7 interesting things about yourself
5. Nominate 7 bloggers or less
6. Post links to the 7 blogs you nominated.

Here are 7 "maybe interesting" things about myself:
1. I would love to be able to create those lovely eye makeup looks I see in tutorials, but have not had success due to my Asian eyes.
2. I'm okay with that.  I think I'm pretty stinkin' awesome, and I'm happy with what God gave me--even without makeup!  :)
3. I'll probably watch only the figure skating events of the Vancouver 2010 Olympics.  
4. The Golden Girls is one of my favorite shows.
5. If I had to pick a "Golden Girl" whose personality is closest to mine, it would have to be Rose.  (not Dorothy--her humor can be a bit harsh!)
6. The only Mardi Gras parade I've ever been to was a dog parade!
7. I laugh hysterically at Steve Martin's "I would like to buy a cheeseburger" bit in The Pink Panther.  It gets me every time! :)


Some people think blog awards are silly, but I just LOVE getting them and passing them along!  When I get an award I try to pass it along to bloggers who I haven't previously given an award to, and/or one who hasn't already received the same award.  :)

I'm passing this award along to:
1. Brandy of Nutmeg Nanny
2. Divine Mrs D of Love is a Verb
3. Faith of An Edible Mosaic
4. Libby of Cooking with Libby
5. Liza of The Smiths
6. Paloma of The Coffee Shop
7. SnoWhite of Finding Joy in My Kitchen

Monday, February 8, 2010

Celebrating 55 Wonderful Years!


Today is my mom's 55th birthday! ♥  To celebrate, I made Paula Deen's "Simply Delicious Strawberry Cake"--which also fits this week's "Sweets for My Sweet" theme for the My Girl, Paula! group.  Even after 30+ years in the U.S., my parents and grandmother have never picked up the American Sweet Tooth (or chocolate obsession), so anything I make for them has to be mildly sweet--and preferably fruity.  With this in mind, I had to make a few modifications to the cake recipe to make it more suitable for their palates.  Did they like it?  Oh YEAH!!! (in my best Kool-Aid man voice)  What made it all the more enjoyable was eating it while watching the Saints win the Super Bowl!  *huzzah*  Even Grandma was watching with us!


Strawberry Cake  (Serves 12)
Adapted from Paula Deen recipe 

Cake:
18.25 oz. box French vanilla cake mix
3 oz. box strawberry gelatin
24 oz. tub frozen strawberries with sugar, thawed (Divided use)
4 large eggs
½ cup vegetable oil
¼ cup water

Filling and frosting: 
8 oz. cream cheese, softened
½ cup powdered sugar
½ box Wilton® Whipped Icing Mix

Preheat oven to 350°F.  Lightly grease three 9" round pans.

Puree strawberries in blender or food processor.  Measure out 15 oz. (about 2 cups) puree and set aside for the cake batter.  Place the remaining puree in a small saucepan and reduce over low heat, stirring occasionally, until about 1/3 cup remains.  Set aside to cool while cake bakes. (Will thicken considerably and appear like jam)

In a large bowl, combine cake mix and dry gelatin.  Add 15 oz. pureed strawberries, eggs, oil, and water; beat at medium speed with an electric mixer until smooth.  Pour into prepared pans.  Bake for 20-25 minutes, or until a wooden pick inserted in the center comes out clean.

Let cool in pans for 10 minutes.  Remove from pans, and cool completely on wire racks.

For the filling: 
Combine softened cream cheese with the reduced & cooled strawberry puree.  Mix in powdered sugar.  Spread between cake layers.

For the frosting:
Prepare the Whipped Icing Mix according to package directions, then spread over top and sides of cake.  Refrigerate until serving time.

Sunday, February 7, 2010

Super Bowl Celebration Cookies


Today's the big day: Super Bowl XLIV!!!  Hope everyone has a great time today cheering on their team...whatever the outcome.  Drinking is almost a given when it comes to football parties, so please--be safe and hand over those keys if you've had too many!

With the Saints earning their first-ever appearance in The Big Game, it was only fitting for me to bring some Saints-themed treats to work on Friday.  (To see the Saints cookies I made earlier in the season, click HERE.)  Wilton® Food Writer markers were used to write on the cookies--something I felt compelled to do in light of the NFL's claim to ownership of the "Who Dat" phrase.  :)   All in all I wasn't 100% happy with the final outcome of the cookies' appearance, but it was the best I could do on a weeknight!

I also made a chocolate chip cookie cake with some milk chocolate chips and brown sugar I received in a "baking goodies" bag from a co-worker.  (Thanks, D!)   To make a cookie cake, just press your favorite chocolate chip cookie recipe into a greased 13 x 18" cookie sheet (I lined mine with foil).  Bake at 350°F for 18-22 minutes, cool, and decorate.  Easy!


What I learned:
- Fleur de Lis are hard to draw :( 
- Blue marker doesn't show up as blue against an orange background
- Writing on cakes is not my strong suit; I've never been good at planning the spacing.  I started writing "Geaux" in an arc...but suffered short-term memory loss once I got to the "a".  And what was I thinking with those hearts?  LOL

Friday, February 5, 2010

Appetizer Week: Spicy Deviled Eggs

Honoring the Saints with my black & gold photo composition  :)

This is it, folks.  The last day of Appetizer Week here at Kitchen Koala.  Have you finalized your menu and plans for your Super Bowl gatherings?  Even if you have, it's not too late for a last-minute addition to your menu!  These spicy deviled eggs have an Asian flair and are a bit of a change from your standard deviled egg recipe, yet they're simple enough to pull together at the last minute!  The ingredients are easy to find--even the Sriracha hot sauce.  I grew up with the stuff, which used to be available only at Asian grocers and specialty shops.  Now it's a staple in many kitchens, thanks in no small part to The Food Network.  Look for it either in the Asian foods section of your grocery store or with the other hot sauces.

What I love about Sriracha: It's got heat and doesn't reek of vinegar.


Sriracha Deviled Eggs (makes 24 pieces, serving 8-10)
From Supper by Mitch Prensky, via CHOW 

12 eggs, hard boiled 
6 Tbl. mayonnaise
2 tsp. Dijon mustard
4 tsp. Sriracha hot sauce
2 tsp. fresh lime juice
2 tsp. finely chopped fresh cilantro
Salt and Pepper

Peel eggs and cut in half lengthwise, carefully removing the yolks.  Place yolks in a medium bowl.  Break up egg yolks with a fork, then add mayonnaise, Dijon, Sriracha, lime juice, and cilantro.  Season well with salt and pepper and mix well until mixture is smooth.  Spoon or pipe egg yolk mixture into egg whites.

Thursday, February 4, 2010

Appetizer Week: Spicy Three Pepper Hummus


Confession:  I adore spicy food.  But you already knew that.  For me, nothing's more disappointing than ordering a restaurant dish labeled "spicy," only to have it deliver a meager amount of heat.  I have been let down many a time.  (Taco Bell's Volcano Nachos, I'm talking to you.)  So when I come across a recipe with "spicy" in the title, I'm fully prepared to make it as directed, armed with extra amounts of the heat-containing ingredient on hand...just in case.  Not so with this Spicy Three Pepper Hummus recipe I found on Allrecipes.com.  Spicy, creamy, garlicky--everything I could want in a hummus.  Serve it up with whole wheat pita wedges at your next gathering, and watch it disappear!  

Tomorrow:  What the devil...

Wednesday, February 3, 2010

Appetizer Week: BBQ Chicken Bacon Ranch Puffs


Barbeque.  Chicken.  Bacon.  Ranch.  Cheddar.  Stop me if you're seeing something you don't like.  These little puffballs combine some of my favorite flavors into one bite-sized, poppable morsel.  Okay, maybe two bites.  The original recipe for these comes from Our Best Bites, a fabulous site run by two very creative and talented ladies.  I took their Chicken-Bacon Stuffed Pizza Rolls and threw in a bit of spicy smoky barbeque sauce and a sprinkle of cilantro to come up with this variation.  You could certainly use a mild barbeque sauce and original ranch dressing mix if you're not a big spicy foods fan!

Join us tomorrow as we continue to celebrate Appetizer Week and prep for our Super Bowl parties!  


BBQ Chicken Bacon Ranch Puffs (makes 24)
Adapted from Our Best Bites

1 can Pillsbury® refrigerated pizza dough
½ cup shredded cheddar cheese
8 slices cooked, crumbled bacon
¾ cup shredded cooked chicken
2 Tbl. Spicy barbeque sauce
1-2 Tbl. chopped cilantro
1 pkg. Hidden Valley® Spicy Ranch dressing mix
2 Tbl. parmesan cheese
1 Tbl. olive oil or butter

Preheat oven according to pizza dough directions (usually 400-425°F).  Spray a 24-well mini muffin tin with non-stick spray, taking care to cover inside surfaces well. 

Unroll pizza dough onto a lightly floured work surface.  Pat dough to approximately 8" x 12".  Cut into twenty-four 2" squares with knife or pizza cutter.   

In a medium bowl, combine cheese, bacon, chicken, barbeque sauce, cilantro, and 1 teaspoon of the dry dressing mix.  Spoon mixture onto the pizza dough squares, forming little mounds (make sure to leave a border on all sides).  Carefully bring corners of dough together, forming a little packet.  Pinch seams well, and form into a little ball.  Try to form the dough as tightly as you can around the mixture.  Mine were somewhat loose (I was tired, hungry, and in a hurry), hence the BIG air pocket in the tops of mine.  Place one ball into each greased muffin cup, seam side down.

Combine 1 teaspoon  ranch dressing mix with Parmesan cheese in a small bowl (reserve remaining ranch dressing mix for another use).  Lightly brush tops of puffs with olive oil or melted butter, then sprinkle with Parmesan mixture.

Bake in preheated 400° or 425°F oven for 10-15 minutes, or until lightly golden brown. 


Up next:  Things that make you go humm....

Tuesday, February 2, 2010

Appetizer Week: Jalapeno Popper Dip


It's Day Two of Appetizer Week here at Kitchen Koala, where I'll be showcasing some wonderful dishes to add to your Super Bowl party spread.  Today's dish:  Jalapeño Popper Dip.  Served up with Ritz® crackers, it's almost guaranteed to be gone by the end of the first quarter!  This stuff is dangerous, folks.  Not 'exploding tin can of condensed milk' dangerous, but 'seriously, majorly harmful to your diet' dangerous.  Get out those elastic pants, 'cause you're gonna need 'em!  It's so incredibly delicious and addictive that once you try it, you just might consider hiding it from your party guests! 

The recipe for Jalapeño Popper Dip is by Robin Sue of Big Red Kitchen.  Some of you may recognize Robin Sue as a "Crafty Superstar" over at Cut Out + Keep.  She's got some fanstastic recipes both there and on her blog, so be sure to check them out when you head over there for the dip recipe.  I made two changes to the recipe: I didn't process the mixture in the food processor, opting instead to drain and chop the peppers myself (because I'm a choppin' kinda gal, and it soothes me!).  And because we like things spicy here in Cajun Country, I added two fresh roasted jalapeño that I peeled, seeded and chopped.  Delicious! 

Tomorrow: Bite-sized bombs of flavor...

Monday, February 1, 2010

Flavor-of-the-Month: Mojito & Cosmo Bites


When Bridget of Bake at 350 announced that January's Flavor-of-the-Month theme would be "Boozy," I immediately started brainstorming for ideas.  For about 10 minutes.  Then I forgot about it.  For an entire month.  I don't know how, but Flavor-of-the-Month somehow slipped off my radar--which meant that I needed a quick no-bake entry for the event.  Enter the Cocktail Bite (aka Jell-O Shot), which you see pictured above in Mojito and Cosmopolitan-inspired flavors.  A quick mix and pour into 1¼-oz. paper cups, followed by a speedy photo shoot (what you see above hasn't even chilled and set yet!), and Voila! Done.  For more boozy ideas, please visit the Flavor-of-the-Month recipe linkup!

Mojito Cocktail Bites (makes eight 1-oz. portions)

12 mint leaves
½ of a lime, cut into small wedges
3 Tbl. sugar
2 Tbl. water
1 envelope unflavored gelatin (such as Knox®)
2 oz. white rum (I only had coconut rum)
¾ cup chilled lemon-lime soda

In a 1 cup glass measuring cup, muddle (aka, mash to heck with a spoon) the mint leaves, lime wedges, and sugar.  Add water and mix.  Remove lime wedges.  Sprinkle gelatin onto surface of mixture and allow to bloom for 5 minutes.  Place cup in the microwave and heat for 30-45 seconds, stopping to stir once.  The mixture should bubble slightly, and the gelatin will start to dissolve.  Once mixture is removed from microwave, continue to stir for about 2 minutes to completely dissolve gelatin.  

Stir in rum and chilled lemon-lime soda (go slow here to allow the carbonation to subside & avoid overflow).  Pour mixture into eight 1¼-ounce paper cups, using a spoon to hold back most of the mint leaves.  Place in refrigerator to chill until set and firm.

*  *  *  *  *  *  *  *  *  *  *

Cosmopolitan Cocktail Bites (makes eight 1-oz. portions)

¼ cup cranberry juice
1½ tsp. lime juice
2 Tbl. sugar
1 envelope unflavored gelatin (such as Knox®)
1½ oz. vodka
½ oz. orange liqueur (Cointreau, Grand Marnier, Triple Sec, etc.)
½ cup chilled lemon-lime soda

Combine cranberry juice, lime juice, and sugar in a 1 cup glass measuring cup.  Stir to combine, then sprinkle gelatin over the top and allow to bloom for 5 minutes.  Place cup in the microwave and heat for 30-45 seconds, stopping to stir once.  The mixture should bubble slightly, and the gelatin will start to dissolve.  Once mixture is removed from microwave, continue to stir for about 2 minutes to completely dissolve gelatin.  

Stir in vodka, orange liqueur, and chilled lemon-lime soda (go slow here to allow the carbonation to subside & avoid overflow).  Pour mixture into eight 1¼-ounce paper cups.  Place in refrigerator to chill until set and firm.

Appetizer Week: Mini Ham & Cheese


With Super Bowl XLIV only a week away (Geaux Saints!),  many of us are starting to plan our menus for the big day's festivities.  Super Bowl Sunday combines four of the things we Americans love the most: football, beer, TV and FOOD!  And lots of it.  Since the majority of the food served will be appetizers and finger foods (who has time to sit with a knife and fork when there's football to be watched?), I'll be featuring an appetizer every weekday this week. First up:  Mini Ham & Cheese Sandwiches

I ♥ miniature food.  If all my food was miniature, I'd be a happy gal.  Now I don't mean small servings or little slices of something--I'm talking mini versions of the real deal, like these sandwiches.  They're simple to throw together, yet pack such an amazing flavor punch!  Seriously, I could eat four (or more!) of these in a sitting if nobody was around to laugh and point at me in disgust.  (Sidenote:  poppy seeds & braces are not friends.  They manage to wriggle their way into every nook and cranny imaginable!)  I first saw this recipe when Jen of Beantown Baker posted them back in December, and it's absolutely fantastic.  Please visit her site for the recipe, and be sure to check out the rest of her wonderful creations!

Tomorrow:  A dip you'll "pop" over!