Monday, November 30, 2009

Flavor-of-the-Month: Traditions


Ah, agar agar--the gelatin of eastern Asian cuisine.  Derived from a seaweed base, it's the perfect vegan alternative to gelatin desserts.  It's difficult to describe exactly the texture of an agar agar dessert.  It's been likened to gelatin, only firmer.  If I had to summarize, I'd say that gelatin is more bouncy/rubbery, while agar agar has more bite/snap.  But even then, it's not quite an accurate comparison.  There's really no true analogue, so I suppose the best way to understand it is to try some!  Agar agar comes in powder or dried (stick) form, and is really quite inexpensive.  You won't find it at your local mega-mart, but any good Asian market in your area should carry it.

November's Flavor-of-the-Month theme is Traditions, and boy is agar agar ever a tradition in our family!  My cousin "J" used to make the most beautiful agar agar molded desserts, taking the time to pour different colors into the various parts of the molds, which were usually floral in design.  The molds may have been destroyed during the aftermath of Hurricane Katrina, but our traditions and memories still live on!  I don't own any of the elaborate molds cousin J used to have, so I relied on my good buddy Mr. Muffin Tin and the set of mini koala pans she gave me for Christmas one year.

Here's (some of) what you'll need:

From left to right: Coconut flavoring, Banana flavoring (aka Amyl Acetate-these were the only English words on the bottle, so luckily I knew what that was from my organic chemistry days.  That's right, Science.  Your big words don't scare me), Pandan flavoring, Coconut milk or cream, Agar Agar powder, and some super-cool koala pans (muffin tins work too!).  You'll also need some water, sugar and a few drops of yellow food coloring--not pictured because I forgot!

Bring coconut cream, water, sugar and agar agar powder to a boil in a medium saucepan (complete recipe is below).  Divide into three small bowls or cups and add flavorings.  Pour small amounts into your pans.  If making layers in muffin tins, let each layer set somewhat before adding the next. 


Unlike gelatin, agar agar will set up at room temperature, but putting in the fridge speeds things along.  Once firm, use the edge of a small knife to coax the agar agar out of the pans.  It should pop out quite easily once the suction is broken. 


Be sure to visit Bridget's blog to check out the "Traditions" Flavor-of-the-Month round-up!  You're sure to see some traditions that are very similar to your own, be reminded of traditions you've long forgotten, or find inspiration to begin new ones with your family!


Tropical Agar Agar Dessert
Adapted from
KookyCulinary's recipe


400 mL coconut cream (NOT cream of coconut)
400 mL water
100 g sugar
4 tsp. agar agar powder
½ tsp. coconut flavor
½ tsp. banana flavor + few drops yellow food color
½ tsp. pandan paste (already very green!)

Combine coconut cream, water, sugar, and agar agar powder in a medium saucepan.  Bring to a boil over medium heat, whisking to dissolve sugar and agar agar powder. Divide liquid evenly among three bowls or cups (I used those plastic Solo® type cups).  Add coconut flavor to one cup, banana flavor & yellow food coloring to another, and the pandan paste to the last cup.  Stir well, then pour into desired molds.  Agar agar sets more quickly than gelatin, and will even set up at room temperature.  However, it tastes best served chilled :)

My Girl, Paula: Pumpkin Gooey Butter Cake ...Again!


These were such a hit the last time I made them that I couldn't resist making them again when they came up on the My Girl, Paula! recipe list.  This time, I swapped out the yellow cake mix with butter pecan cake mix and got more compliments on the crust than the pumpkin part!  Try it, you'll love it :)  Visit the new My Girl, Paula! page to check out the other members' creations, and be sure to welcome the group's new host, Michelle of Something New is Cooking.

Sunday, November 29, 2009

Eleven and OH...Here We Go!


I don't watch football, which means I have nothing to contribute to the Monday morning conversations at work for six months out of the year.  Since 99.9% of the discussions revolve around "the game" or the standings of their fantasy football league, I tend to steer clear of the break room during football season.  I may not know much about the sport, but I DO know this: if there's one thing that football is good at, it's uniting people.  With the Saints doing so remarkably well this year, everyone's been in such good spirits.  Let's hope these good moods continue to linger in the air, regardless of the Saints' record...which will hopefully be 11-0 when they defeat the Patriots Monday night!

Cookie Recipe
Royal Icing Recipe

 This is one of my first ventures into decorating sugar cookies with royal icing.  While I found the icing very easy to pipe and decorate with, the crunchy texture just wasn't to my liking.  I might stick to my usual icing, sacrificing the decorative details for a softer-eatin' cookie!  The Fleur de Lis cutter is from Bake it Pretty, one of my favorite supply shops.  The jerseys were cut using a baby onesie cutter, then trimmed to remove the bottom part.  I didn't like the shape of the football cutter from my Wilton 101 cutters set, so I cut one myself with the biggest round cutter from that set--Venn diagram style.

Friday, November 27, 2009

Winner!


My copy of Williams-Sonoma Holiday Entertaining arrived today!  What an awesome prize for winning the All Through the Year Cheer: Thanksgiving recipe round-up!  Guess what I'm reading tonight?

Tuesday, November 24, 2009

Jared Would NOT Approve.


But I bet he would sneakily swipe one of these cookies when you (or the cameras) weren't looking.  Who am I talking about?  Jared Fogle, of course!  Of Subway® diet fame.  His story is amazing, but I've gotta tell ya--as much as I love me some Subway® sandwich, I couldn't eat two veggie subs a day for more than a few days.  I could however, eat one of their cookies every day.  Hmmm...will it be chips or two cookies with my meal?  If you've ever wanted both options, make a batch of these cookies and stash one away in your pocket the next time you go out for some Subway®.  These taste eerily like their white chocolate macadamia nut cookies, only with chocolate chunks instead of nuts. 

Recipe: Five Star Chocolate Chip Cookies, by Land O'Lakes.

Recipe Notes:
I used a 12 oz. bag of white chocolate chips plus about 8 oz. chocolate chips.  Mine didn't look like the ones in the recipe photo, but they were still very good.  These puppies were big-- about 3.5" around--but flatter than I expected.  Right after baking, they seemed crisper than normal.  Very crisp.  Oh snap!  (literally!)  I feared I'd overbaked, but the bottoms were still very pale so I didn't know what went wrong.  With a sad sigh I tucked them away in a plastic tub and went to bed.  The next morning the texture was perfect--crispy yet chewy and unexpectedly Subwayesque! 

Monday, November 23, 2009

My Girl, Paula: Beef Vegetable Soup

This week's My Girl, Paula! dish is "The Lady & Sons Beef Vegetable Soup," a perfect cold-weather meal.  It's a great pick for Thanksgiving week, because your family can eat out of that big pot of soup all week while you save your energy for cooking the big feast!  In need of some fresh ideas for your Thanksgiving spread?  Be sure to check out the other members' blogs for more inspiration; you're sure to find something new and tasty to make for Thursday's meal or any time of the year!  


The recipe is sized to feed an army, so I scaled it down to one-third of the original.  It doesn't make much sense to use all the individual vegetables called for, unless you happen to have them on hand already (the amounts in the scaled down recipe would be 1/3 cup).  Instead, I used a frozen vegetable blend (PictSweet® Old Fashion Vegetable Soup) which included almost all of the vegetables needed: potatoes, tomatoes, carrots, corn, green beans, peas, onion, celery, and butter beans.  That pretty much covers the original ingredients list (besides the black-eyed peas and okra, but I don't think I'll miss them)!  AND it was on sale for $1.00!


Smaller Batch Beef Vegetable Soup (Makes about 2½ quarts)
Adapted from Paula Deen's recipe in The Lady & Sons, Too!

1 to 1½ lbs. beef short ribs
5 cups cold water
1 tsp. dried Italian seasoning
1 Tbl. dried parsley
2 tsp. beef bouillon granules (or 2 cubes)
1 tsp. garlic salt 
1 tsp. seasoned salt
1 small bay leaf
½ tsp. black pepper
¼ tsp. celery salt (or seed)
1 tsp. Worcestershire sauce
10 oz. can Mild Ro-Tel® tomatoes, undrained*
16 oz. frozen vegetable blend - PictSweet® "Old Fashion Vegetable Soup"
¼ cup uncooked elbow macaroni
½ tsp. Accent (MSG--optional)

 *Use regular diced tomatoes if preferred.

Heat a large (4 qt.) Dutch oven or soup pot, and add short ribs.  Let brown for a few minutes (no oil needed), then add water, seasonings, and tomatoes to pot.  Bring to a boil over high heat, then cover and reduce heat to low.  Let simmer for 1½ to 2 hours, or until meat is very tender.  Carefully remove short ribs from pot**.  Cut the meat from the bones, discard the bones and fat, and return meat to pot.  Add frozen vegetables to pot, and return the soup to a boil.  Reduce heat to low and simmer for 25 minutes.  Add macaroni to pot and continue simmering for another 20 minutes.  Add Accent, if desired, and adjust other seasonings to taste.  

**Fat may be skimmed from soup now, if desired.  Or, prepare soup a day ahead of serving.  Cool soup and place in refrigerator.  When soup has chilled, the fat will solidify and be easier to remove.

Saturday, November 21, 2009

Sweet Potato Casserole


 Happy Thanksgiving, dear readers!  I have so much to be thankful for this year, and I truly hope you do as well.  For those of you heading out of town this week, I wish you safe and speedy travel.  Enjoy the holidays and treasure the moments you have with your family and friends! 
I ♥ sweet potatoes.  Bake 'em, mash 'em, fry 'em up--I'll take them all.  But when it comes to that iconic Thanksgiving concoction, bedecked in all its marshmallow glory, it's a different story altogether.  No one in our family makes it, so I didn't eat it growing up and never grew accustomed to its sweet candy goodness.  It's more confection than vegetable, and it deserves a spot on the dessert table, far away from the rolls and green bean casseroles.  

You can imagine my delight as I browsed through the first issue of my Cook's Country subscription and spotted a recipe for sweet potato casserole unlike any other I'd ever seen.  It was topped with the big (regular) marshmallows instead of the minis, but what hooked me was the amount of sugar required.  Only two teaspoons for the five pounds of sweet potatoes!  Teaspoons, not cups!  Finally, a sweet potato casserole I (and my non-sweet tooth family) can live with.  

This is my third entry for the Thanksgiving All Through the Year Cheer round-up, because I just HAD to share this recipe with you!  It's fantastic and a real show-stopper.  If you're still in the menu-planning stages or haven't finished your Thanksgiving grocery shopping yet, consider adding this dish to your holiday table!  Better yet, stop by All Through the Year Cheer on Monday, November 23rd, to view the recipe round-up.  There will be lots of new & inspiring dishes for you to browse!
 

Sweet Potato Casserole  (serves 8-10)
Cook's Country, October/November 2009

5 lbs. sweet potatoes, peeled and cut into 1-inch chunks
6 Tbl. heavy cream
6 Tbl. unsalted butter, cut into 6 pieces
2 tsp. sugar
1 tsp. salt
½ tsp. pepper
2 oz. cream cheese
10 oz. bag marshmallows, halved crosswise (use greased scissors)

Combine potatoes, cream, butter, sugar, salt, and pepper in Dutch oven.  Cook covered, stirring occasionally, over medium heat until potatoes begin to break down, 20 to 25 minutes.

Reduce heat to medium-low and continue to cook, covered, until liquid has been absorbed and potatoes are completely tender, 15 to 20 minutes.  Meanwhile, adjust oven rack to upper-middle position and heat oven to 450°F.

Add cream cheese to pot.  Using potato masher, mash until cream cheese is fully incorporated and sweet potatoes are smooth.  Continue to cook, stirring constantly, until potatoes are thickened, about 5 minutes.

Transfer potato mixture to 2-quart baking dish and top with single layer marshmallows.  Bake until marshmallows are browned, about 5 minutes.  Serve.

To make ahead:  After transferring sweet potato mixture to baking dish, mixture can be refrigerated, covered, up to 2 days.  Microwave until warm for 4 to 7 minutes before topping with marshmallows and baking as directed.


All Through the Year Cheer: Thanksgiving


11/24/09 Update:  This cake was selected as the winner!  Yay!  Thanks to Laurie Lufkin, who created the recipe as well as Faith & Nutmeg Nanny for making the selection.  I will soon be the proud owner of a copy of Holiday Entertaining by Williams-Sonoma :)

In search of a dessert that showcases all of autumn's best flavors?  Look no further.  The prize-winning "Taste of New England Harvest Bundt Cake" by Laurie Lufkin (of GoodMorningGloucester) is the perfect addition to any holiday table.  Cream cheese, maple syrup, cranberries, spices, pumpkin, apples, nuts--what more could you want?   And lest you think there are too many flavors in this cake, don't worry.  This cake tastes like pure Autumn, without any of that pesky "too much going on" syndrome.

Be sure to check out all the entries for Thanksgiving's "All Through the Year Cheer" event.  Recipe round-up and winner will be posted on November 23rd--just in time for you to add a few recipes to your Thanksgiving menu!  The original recipe may be found below, with my changes written in BLUE.  It's a long recipe, yes, but the final product is well worth the effort!


Taste of New England Harvest Bundt Cake
by Laurie Lufkin of GoodMorningGloucester (link)

Filling:
8 oz. cream cheese, softened
1 egg yolk (used a whole egg by mistake)
2 Tbl. cornstarch
¼ cup Vermont maple syrup
¼ cup brown sugar
2 Tbl. butter, softened
¼ tsp. salt
½ tsp. cinnamon (omitted)
2 Tbl. Cape Cod whole berry cranberry sauce (used orange marmalade)
cup dried Cape Cod cranberries, chopped
added: ½ tsp. orange extract

Cake:
3 cups all-purpose flour
2 tsp. baking soda
2 tsp. cinnamon
¾ tsp. nutmeg, freshly grated
¾ tsp. powdered ginger
½ tsp. salt
1 cup granulated sugar
1 cup brown sugar
1 cup butter, softened
4 eggs
1 cup butternut squash or pumpkin puree (used canned pumpkin)
1 cup sour cream
1 tsp. vanilla extract

Topping:
½ cup Macintosh, Granny Smith, or other tart New England apple sauce (used Mott's® unsweetened applesauce)
1 cup confectioner's sugar
¼ tsp. cinnamon
2 Tbl. apple brandy (used apple butter--cake needed to be work-friendly!)
2 Tbl. heavy cream
¼ tsp. vanilla extract
¼ cup New England hazelnuts, toasted and chopped (used walnuts)
¼ cup dried Cape Cod cranberries, chopped

In a medium bowl prepare the filling.  Beat together cream cheese, egg, cornstarch and maple syrup.  Add brown sugar, butter, salt, cranberries, orange marmalade and orange extract until combined.  Refrigerate until ready to use but for at least one hour.

Preheat oven to 350°F.  Heavily grease a 12-15 cup Bundt pan and set aside.

In another bowl sift together flour, baking soda, cinnamon, nutmeg, ginger and salt and set aside.

In a large bowl beat granulated sugar, brown sugar and butter until light and fluffy.  With mixer running, add eggs one at a time and mix until blended.  Beat in squash/pumpkin, sour cream and vanilla until well combined.  Beat in flour mixture until just combined.

Spoon one third of the batter into the pan.  Spoon filling in a circle on top of batter but do not allow filling to touch the edge of the pan (a tiny ice cream scoop is perfect for this; I put the filling in a pastry bag and squeezed a ring of filling onto the batter.  I couldn't stop the filling from spreading and touching the sides of the pan.  So instead of a ring of filling I got more of a swirled cake).  Top with remaining batter.

Bake at 350°F for 55-65 minutes until golden brown and cake tester comes out clean.

Remove from oven and place on cooling rack for 15 minutes.  Turn out onto serving plate to cool completely.

Before serving, make the glaze.  Whisk together apple sauce, confectioners sugar, cinnamon, apple brandy (or butter), heavy cream and vanilla extract in small bowl.  Drizzle glaze over cake and sprinkle with walnuts and cranberries.  Enjoy!

All Through the Year Cheer: Thanksgiving


Aside from a glorious golden turkey, few things say "Thanksgiving" better than cranberry sauce and pie.  So why not combine them?  This Cranberry Crumb Pie recipe comes to us from the good folks over at Eagle Brand®, and contains both sweetened condensed milk and cream cheese (two of my favorite things!).  The sweet, creamy cheesiness of the bottom layer perfectly complements the mildly tart cranberry layer, while the crumb topping provides a nice textural contrast.  Sound delicious?  It was.

This recipe is being submitted for All Through the Year Cheer's Thanksgiving event.  The recipe round-up will be posted on November 23rd (this Monday) along with the lucky winner, so be sure to check it out!  If you love holidays and the all the wonderful foods associated with them, consider joining in on the fun!  We'll be celebrating Chanukah next!

Cranberry Crumb Pie
Adapted from Eagle Brand®

9-inch unbaked pie crust
8 oz. cream cheese, softened
14 oz. can sweetened condensed milk
¼ cup lemon juice
2 Tbl. brown sugar
2 Tbl. cornstarch
16 oz. can whole berry cranberry sauce
Crumb topping (recipe follows)

Preheat oven to 425°F.  Bake pie crust 6 minutes; remove from oven.  Reduce oven temperature to 375°F.

Beat cream cheese in large bowl until fluffy.  Gradually beat in sweetened condensed milk until smooth.  Stir in lemon juice.  Pour into partially baked pie crust.

Combine brown sugar and cornstarch in small bowl; mix well.  Stir in cranberry sauce.  Spoon evenly over cream cheese mixture.  Top with crumb topping.

Bake 45-50 minutes or until bubbly and golden.  Cool.  Serve at room temperature or chilled.


Crumb Topping:
¼ cup brown sugar
½ cup flour
½ cup oats (quick or old-fashioned)
¼ cup butter, cut into 8 pieces

Place brown sugar, flour, and oats in a medium bowl, and stir to combine.  Add butter pieces.  With a large fork or a pastry cutter, work through mixture until crumbly.  Use to top pie before baking.

Friday, November 20, 2009

Apple Butter Bundt


Here's the recipe for one of the desserts we had on our (early) Thanksgiving table.  If you're lucky enough to have a stock of homemade apple butter on hand, this recipe is fantastic way to utilize it. 


Apple Butter Bundt
Adapted from Musselman's®

2 cups all-purpose flour
1 tsp. baking soda
½ tsp. salt
½ tsp. cinnamon
½ tsp. nutmeg, freshly grated
½ tsp. ground cloves
½ c. butter, softened
 cup + 2 Tbl. sugar
2 eggs
 cup sour cream
1 cup apple butter
1 small Granny Smith apple, peeled and finely chopped  (I was a somewhat disappointed with the cake:apple raio. Should have used 2 apples, or one big one.)

Glaze:
cup cinnamon chips
1½ tsp. vegetable shortening

Preheat oven to 325°F.  Grease a 10-cup Bundt pan. 

Sift together flour, baking soda, salt, cinnamon, nutmeg and cloves; set aside.  Beat sugar and butter until fluffy.  Beat in eggs, one at a time.  Combine sour cream and apple butter.  Add to sugar mixture alternately with flour mixture, mixing well after each addition.  Fold in chopped apple.

Spoon into prepared Bundt pan, smoothing batter with a spatula.  Bake at 325°F for 35-40 minutes or until cake tests done.  Let cool in pan for 10 minutes, then invert onto wire rack or serving platter to finish cooling.  Top with glaze.

Cinnamon chip glaze: Place the cinnamon chips and the shortening in a small glass bowl in the microwave on high power. Heat until the chips have just melted, 30-45 seconds. Remove the bowl from the oven and stir the glaze until it is smooth. Or melt the chips and shortening in a small saucepan over low heat, stirring constantly, 1 1/2 to 2 minutes.  Pour glaze over cooled Bundt cake.


Monday, November 16, 2009

My Girl, Paula: Corn Casserole


This week's My Girl, Paula! dish is a member's choice, and I knew exactly what I was going to make for it: corn casserole.  Our family celebrated Thanksgiving a little early this year, so we gathered Saturday afternoon for the feast!  On the menu:  Roast turkey, honey ham, stuffing, mashed potatoes & gravy, cranberries, sweet potato casserole, green beans with caramelized onions, corn casserole, dinner rolls, cranberry crumb pie, pumpkin gooey butter cake and an apple butter Bundt.  Yum!  Holiday food is the best ♥ (Items in purple will have recipes posted later this month, so be on the lookout!) 

Corn casserole has been a family favorite for a few years now.  I've lightened up the texture by adding 2 eggs (my grandmother prefers it with eggs), and the reduced the fat a bit by cutting the butter amount in half.  I've tried it without butter completely, and it's just not the same without it.  Sometimes I add cheese, sometimes I don't.  I've noticed that the online recipes (both at Paula Deen's site and the Food Network) have cheese listed, while the original printed in The Lady & Sons, Too! does not.  Curious...


Corn Casserole (adapted from Paula Deen)
Serves 8-10

2 eggs
1 cup sour cream
¼ cup melted butter
15¼ oz. can whole kernel corn, drained
14¼ oz. can cream-style corn
8 oz. pkg. Jiffy® corn muffin mix
garlic powder, to taste
black pepper, to taste
Creole seasoning (like Tony Chachere's®), to taste

Preheat oven to 350°F.  Grease a 2 or 3 quart casserole.  In a large bowl, whisk eggs, sour cream, and melted butter.  Add both cans of corn and corn muffin mix to bowl.  Stir together with a spoon or rubber spatula.  Season to taste.  Pour into greased casserole dish, and bake at 350°F for 40-60 minutes, or until set and golden brown.  (The time given varies widely depending on the size and depth of your casserole dish.)


Sunday, November 15, 2009

It's National Bundt Day, Ya'll!


No, your eyes do not deceive.  That is one TALL Bundt cake, made possible by my new Nordicware 60th Anniversary Bundt Pan.  I'm in ♥ with it. At the time, my order included a bonus Bundt cookbook (hooray for free stuff!). I wasted no time marking out the recipes I wanted to try, and among them was "Lady Bird's Famous Lemon Cake."  Yes, THAT Lady Bird.  Coincidentally, the pan itself came with that recipe on the back of the label--but scaled up to better fit the larger pan size and with the title "Lady Bird Johnson's Lemon Bundt Cake."  Apparently our former first lady was quite famous for her lemon Bundts!

Today, November 15th, is National Bundt Day.  Celebrate by making a Bundt cake of your own!  Looking for some recipes?  Check out The Food Librarian, who has been celebrating the Bundt cake with the "I Like Big Bundts" series!  30 Bundts in 30 days!


Note: the recipe below is for a 15-cup Bundt pan.  If you have a 10 or 12-cup Bundt pan (more common), use THIS recipe instead.  There's a lot of sifting ahead, so get ready 'cause you'll need to sift the flour mixture a total of four times.  Is it really necessary?  I don't know, but I did it anyway just in case!  This is the perfect recipe to use if you've got a whole mess of egg yolks in your fridge, like I did after making all that Swiss meringue buttercream lately!


Lady Bird Johnson's Lemon Bundt Cake

1 cup butter, softened
1 cups sugar
10 egg yolks, lightly beaten
3 cups cake flour
4 tsp. baking powder
½ tsp. salt
1 cup milk
1 tsp. vanilla extract
1 Tbl. grated lemon zest (or one large lemon)
2 Tbl. lemon juice

 Preheat oven to 325°F.  Grease and flour a 15-cup Bundt pan.

Cream butter and sugar until light and fluffy.  Add beaten egg yolks until incorporated.  Sift together cake flour, baking powder, and salt.  Re-sift three times.  Add to butter mixture, alternating with milk.  Mix until incorporated.  Add vanilla, lemon zest, and lemon juice.  Beat 2 minutes. 

Spoon batter into prepared pan and bake for 1 hour, or until cake tester comes out clean.  Cool cake in pan 10 minutes.  Invert onto serving platter to complete cooling.  Dust with confectioner's sugar if desired, or glaze.


Be on the lookout for 2 more Bundt cake recipes this month!

Thursday, November 12, 2009

Fauxtisserie Chicken


Grocery store rotisserie chicken is one of my favorite grab-and-go meals, but it can sometimes come at a premium price.  (I've paid $6.99 for a small chicken before! Oh, the price of convenience.)  Wanna customize the size and flavor of your chicken?  At a rock-bottom price?  The next time you see whole chickens on sale, pick up a few and stash some in your freezer--but not before you make Fauxtisserie Chicken.  All you need are a few ingredients, a slow cooker, and some wait time.  Prep time is quicker than two shakes of a lamb's tail, so let's get started!


Fauxtisserie Chicken (from Our Best Bites)

1 chicken, small enough to fit in your slow cooker
salt-based seasoning (I used this.)
6 peeled garlic pods

Place 3 or 4 balls of aluminum foil in the bottom of your slow cooker insert.  The foil will keep the chicken from sitting on the bottom and stewing in its juices.  {My chicken was crazy juicy, because by the end of the cook time the whole insert was nearly filled with liquid.  I used a turkey baster and removed over 2 cups of liquid around hour #6.  You may or may not have to do this, depending on your bird. Sure, you could leave it in there, but then you'd have stewed chicken.  We're going after a "rotisserie" style.  Don't be concerned about the chicken drying out--it's perfectly juicy!}

Rinse and dry chicken.  Insert garlic pods underneath the skin - 2 each on either side of the breast and 1 each in the legs, or wherever you're able to fit them.  Sprinkle chicken very liberally with seasoning on all sides.  Be sure to get under the wings and legs!  Place chicken in slow cooker insert, breast side up.  If the legs are flailing about, truss them with some kitchen twine or unwaxed, unflavored dental floss (I keep a spool in my knife drawer!  Handy for slicing cinnamon roll dough and cheesecakes, too).  

Place the lid on slow cooker and cook on LOW setting for 7-8 hours.  That's it!  (Unless you need/want to siphon off excess juices)

Here Piggy Piggy...


Pigs in a Blanket.  Can I even call them that if I used all-beef dogs?  "Franks in Blanks" just doesn't have the same ring to it, ya know?  For this adventure, I used Nathan's Famous Beef Franks, my new favorite brand.  Hot dogs are a rare treat in my house, so when I do choose to have them, why not go with one so delicious that a man could eat 68 of them in 10 minutes?  Yes, I know hot dogs aren't considered "real food" to some people, and they're far from being a lean meat choice.  Turkey dogs I can handle, but the fat-free stuff?  Well... if hot dogs aren't real food then the fat-free dogs can't possibly be any closer.  I just looked it up, and most of them have around 40 calories.  Forty?  Really?  What can they possibly be made of?  No thanks, I'd rather eat the good stuff in moderation! :)


Pigs in a Blanket (adapted from Taste of Home)

 1 pkg. (¼ oz.) instant yeast
 cup sugar 
 cup warm milk (110-115°F) 
 cup warm water (110-115°F)
1 egg, beaten
2 Tbl. butter, melted
1 tsp. salt
3 cups all-purpose flour
 cup whole wheat flour
8-10 hot dogs (I used 8 and made breadsticks with the excess dough)

In a stand mixer fitted with with a dough hook, combine all ingredients except hot dogs.  Mix well to form soft dough, then knead until smooth and elastic, about 8-10 minutes.  Since we're using some wheat flour, the dough won't form a smooth ball, and the sides of the mixer bowl won't come completely clean.  (You can also do knead by hand, if preferred.  Flour up your work surface first.)

Place in a greased bowl, turning once to grease top.  Cover and let rise in a warm place until doubled, about 1 hour.  Punch dough down; divide into 10 portions.  Flatten each portion into a rectangle and wrap around hot dogs; pinch seam and ends to seal.  Roll on counter briefly to smooth out and evenly distribute dough.  (If you only have 8 hot dogs, shape dinner rolls or breadsticks with the excess dough.)  Place seam side down onto greased baking sheets; let rise for 30 minutes.  Preheat oven to 350°F in the meantime.

Bake at 350°F for 15-18 minutes or until golden brown.  Serve with plenty of ketchup & mustard for dipping (or my favorite, honey mustard!)

Tuesday, November 10, 2009

Break Out Those 'Hunny' Pots!


That image is pretty much self-explanatory.  And if it didn't make you smile, I don't know WHAT will!  :)  Now that you've got Pooh Bear on your mind too, let's bake up a honey cake!

This delightful cake is made with honey, whole wheat flour and almonds baked into a compact little Bundt.  Unlike many honey cake recipes I've seen, this one does not contain tea or coffee.  Nor it is heavily spiced, allowing the taste of honey to shine more brightly.  Save this cake for special occasions or days you're in the mood to splurge--the best quality honeys can be quite expensive.  When possible, buy local honeys from smaller, family-owned apiaries.  For this recipe I used Bernard's Acadiana Honey, packaged in Breaux Bridge, LA--just a few miles from where I live and work.


Recipe:
Honey Cake by King Arthur Flour Company.  I used a well greased 10-cup Bundt pan instead of the 9-inch cake pan.  Bake time was about the same.


Verdict:  This cake is moist, sweet & buttery with the unmistakeable flavor of honey.  I didn't care much for all of the almonds in the cake, which are supposed to provide a textural counterpoint.  I almost substituted the almonds with diced dried apricots--an idea I should have followed through!  Oh well, maybe next time :)

Lookin' for more Bundt action?  Head on over to The Food Librarian for tons of great Bundt cake recipes.  She's currently running the "I Like Big Bundts" series--30 Bundts in 30 days!  Sheer madness--all in the name of National Bundt Day, coming up on November 15th.

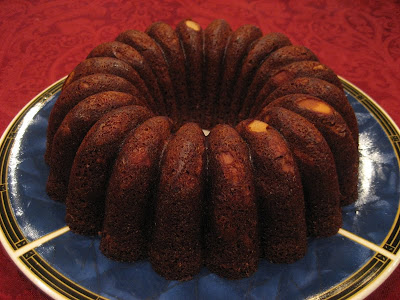
Pantry Raid Bundt


If you've got a large (15-cup) Bundt pan on your hands, you MUST try this 'recipe' soon!  Rich, moist and deeply chocolate, this cake will squash your cravings in no time.  Yes, it relies on convenience products.  Cheating?  Maybe, but you'll quickly change your tune once you take that first bite!


"Twice As Easy" Chocolate Bundt
Yields: one large Bundt cake (24 servings)

1 box (18.25 oz.) Devil's Food cake mix, plus ingredients to prepare
1 box Brownie mix (9x13" pan size), plus ingredients called for on box

Preheat oven to 325°F.  Generously grease a 15-cup Bundt pan.  If you only have a 12-cup pan, use extra batter to make a layer cake or cupcakes.

In a very large mixing bowl, stir together dry cake mix and brownie mix.  Add eggs, oil, and water (amounts needed depend on brand--check the packages).  Mix on low speed to moisten.  Scrape sides and bottom of bowl.  Mix batter on medium speed for 2 minutes.  Pour 
into prepared Bundt pan.

Bake at 325° for 55-65 minutes, or until cake tests done.  I left mine in for 70 minutes and over baked a bit.  Let cool in pan on wire rack for 15 minutes, then invert onto serving platter to finish cooling. 

Sunday, November 8, 2009

Greedy Hands Make Puffy Muffins


The batter for a standard muffin "should" theoretically make three mini muffins.  That's the rule of thumb I normally go by, but today I got greedy and went for a 1:2 ratio.  The result:  spectacularly domed, not-so-mini muffins.  Score one for hungry tummies!  I streamlined the recipe for the chocolate pumpkin muffins I made previously, using a Triple Chocolate Fudge cake mix that already contained chocolate chips.  I found the amount of chips I used in the last attempt too abundant/distracting, so the smaller chips in the cake mix were the perfect amount for me, the non-chocoholic. (I say that, but a quick peek at my tag cloud on the right shows that I most frequently make chocolate, cookie, or cupcake items--the bigger the word, the more often it appears in my blog.  Widgets are neat!)


Fudgey Pumpkin Mini Muffins (makes 24-36)

18.4 oz. box Betty Crocker® Triple Chocolate Fudge cake mix
15 oz. can pumpkin puree

Preheat oven to 350°F.  Place paper liners into 24-36 wells of a miniature muffin tin(s). These muffins are sticky, so you'll lose some to the paper liner if you don't grease the liners first.  For a regular muffin this might be okay, but when it's a mini, you'll want to lose as little as possible.  Or, you can grease up the wells generously.  I greased 24 muffin wells, because I wanted bigger minis without having to peel off the papers when I'm ready to eat.  Greedy AND lazy! :)   (muffins pictured above were slipped into liners for the photo.)

Place cake mix and pumpkin puree in a mixing bowl, and mix well until combined.  This may take some time, and you might think that it will never incorporate...just be patient.  Once it's all mixed, portion into prepared muffin tin(s).  TIP:  Use damp fingers to smooth out the tops for a better baked apperance.  How they look going in the oven is pretty much how they'll look when they come out!  Bake at 350°F for 15-18 minutes, depending on size.

Thursday, November 5, 2009

An American Classic Goes Cupcake...and a Secret

Confession:  I'm an easy sell.  I probably stand in the 0.01% of Americans who actually like television commercials,  so when Pillsbury sponsors a huge block of programming on the Food Network, I will sit and zombie stare at their ads.  Even if they insist on running a loop of the same three commercials.  Throw in a lovable giggling mascot and you can forget it--I'm hooked.  I want to make Funfetti® cake NOW, dagnabbit, and no one's gonna stop me.  Because honestly, sprinkles DO in fact make things better.  And thus was born my second Cupcake Hero entry:

PB & Yay! Cupcakes:
Peanut butter Funfetti® cupcake with grape Swiss meringue buttercream, topped with a white peanut butter cup and rainbow sprinkles.


Voting begins a few days after the entry deadline (Nov.15th).  Don't worry, I'll remind you guys to vote! :)

This is definitely a very kid-friendly recipe, but it will certainly delight any adult with fond memories of a good PB & J sandwich for lunch and a Funfetti® cake on their birthday. Want more nostalgia? I added Kool-Aid® to the frosting recipe (for flavor & color)!  But...I wonder if I could substitute a package of grape Jell-O® for a portion of the sugar?  It's mostly sugar, after all, and the gelatin might help stabilize the egg whites while beating.  The only problem I forsee is the acidity interfering with emulsion formation.  Any thoughts?

PB & Yay! Cupcakes  (makes 24)

18.25 oz. box Pillsbury Funfetti® cake mix
8 oz. sour cream
1/3 cup oil
½ cup milk
½ cup peanut butter
2 eggs

Grape Swiss Meringue Buttercream, recipe follows
24 miniature white peanut butter cups
Rainbow sprinkles

Preheat oven to 350°F.  Place paper liners into the wells of 2 muffin pans.  In a mixing bowl, combine cake mix, sour cream, oil, milk, peanut butter, and eggs.  Beat on low speed for 30 seconds to moisten, then scrape sides and bottom of bowl.  Increase mixer speed to medium and continue beating for another 2 minutes. 

Portion into 24 muffin cups, and bake at 350°F for 18-23 minutes, or until cakes test done.  Let cool in muffin pans for 10 minutes before removing to wire racks to finish cooling (cupcakes will be somewhat fragile until cool).  Frost cupcakes with grape Swiss meringue buttercream and top with rainbow sprinkles.  Press a miniature peanut butter cup in the center of each frosted cupcake.


Grape Swiss Meringue Buttercream (adapted from HTEAC)

(enough to frost 24 cupcakes generously, with some leftover)

1¼ cups sugar
4 egg whites
8 oz. unsalted butter, softened but still cool
1/3 cup grape jam
¼ tsp. grape Kool-Aid®

Place sugar and egg whites in a heat-proof bowl set over a pot of simmering water (double-boiler set-up). Heat, whisking constantly, until mixture reaches a temperature of 160°F. Take your time and bring the mixture up to temperature slowly; you'll know you're close when the mixture starts to get a little foamy. Once mixture has reached 160°F, remove from heat and pour into the work bowl of your stand mixer. Using the whisk attachment, beat the hot mixture on high for 5-7 minutes, until a marshmallow-type consistency is acheived.

 **Important: Feel the sides of mixer bowl at this point. It needs to be at room temperature before proceeding. Chances are, it's still a bit warm. 160°F is pretty hot, so it may take some time to cool off.

 Once the sugar-egg mixture has cooled down, switch over to your paddle attachment. With the machine running at medium-high, add the butter 1 Tablespoon at a time. At some point during this process, the frosting might look curdled--that's okay. Keep going and it should work itself smooth. Once all the butter is added, continue beating until a thick frosting is formed. I hate to use this phrase, but...you'll know it's done when you see it. Your mixture will probably look loose and batter-like for the longest time, then as you're watching the mixer go and go for what seems like an eternity, in an instant it will transform to a thick & pipeable consistency.

While frosting is beating, combine grape jam and grape Kool-Aid® in a small bowl; stir to dissolve and set aside. Don't be tempted to add more than ¼ teaspoon...the unsweetened powder is very sour! Once frosting is finished mixing, add grape jam and beat to incorporate. 

Tuesday, November 3, 2009

My Girl, Paula: Baked Pasta Florentine


This dish sure brings back memories.  The first time I prepared it, I was living in a different city and trying to juggle graduate school and two jobs.  It wasn't easy, and I never finished grad school.  But...I did do a lot of cooking during that time.  With two hungry male roommates and their friend who visited often (and near dinner time, too!), I always had an audience to cook for.  A LOT of Hamburger Helper® was consumed during that year, but on the weekends I liked to break out the casseroles or Paula Deen recipes--which were always a hit.

This week's My Girl, Paula! selection is Baked Pasta Florentine. It's a delicious but hearty dish, so plan on having leftovers.  I normally divide the casserole into two smaller dishes and freeze one for those busy days when you're short on time but still want a home-cooked meal.   The recipe may be found here or on page 70 of Paula Deen's The Lady & Sons, Too! cookbook.  Don't be scared off by the amount of oil; just reduce it if you're concerned.  I actually use butter (Paula would be proud!), but in half the amount called for.  Enjoy!

Sunday, November 1, 2009

I'd Let You Borrow My Cell, but I Don't Think That Number is in My Coverage Area

Sorry, dude.  I know how much you wanna phone home about how awesome these cupcakes are, but I don't think that's gonna happen.  Guess you'll just have to stay here with me.  I'm sorry I had to trick you with Reese's Pieces®.  It's not that I think you're dumb or anything, I just knew you'd like them and wanted you to come out.  They are quite delicious, no?  Oh hey--remember when you got drunk?  Or when you played dress-up?  Yeah...good times.


Here's my first entry for November's Cupcake Hero event, hosted by CB of I ♥ Cuppycakes!.  Entry deadline is November 15th, and voting starts a few days later when the round-up is posted.  I'll post a voting reminder in a few weeks ;) The theme for this month is Peanut Butter, so I thought I'd pay tribute to my favorite extraterrestrial by incorporating his favorite candy into the recipe.  If you ask me, Reese's Pieces®, with their delicate crispy shell and smooth creamy center, are the "bomb dot com."  Sooo much better than those pesky M&Ms® (whose owner, Mars, Inc., declined the movie tie-in).  Chocolate cake with Reese's Pieces® is pretty good, but what puts this cupcake over the top is the peanut butter Swiss meringue buttercream (SMBC).  If you've never made SMBC before, you're missing out!  It's delicious and worth the extra effort.


E.T.'s Favorite Cupcakes:
Chocolate cupcake with peanut butter chips and Reese's Pieces® mixed in, frosted with peanut butter Swiss meringue buttercream.  Topped with more Reese's Pieces®, of course!


E.T.'s Favorite Cupcakes  (makes 24)

18.25 oz. box Betty Crocker® devil's food cake mix
8 oz. sour cream
4 oz. butter, melted (1 stick)
½ cup milk
2 eggs
½ cup Reese's Pieces® candy
½ cup peanut butter chips

Peanut butter SMBC, recipe follows
approx. ½ cup chopped Reese's Pieces® for garnish

Preheat oven to 350°F and line two muffin pans with paper liners.  In a mixing bowl, combine cake mix, sour cream, melted butter, milk, and eggs.  Beat on low speed for 30 seconds to moisten.  Scrape sides and bottom of bowl.  Increase mixer speed to medium and continue beating batter for 2 minutes (batter will be quite thick).  Fold in Reese's Pieces® and peanut butter chips.  Portion into 24 paper-lined cups, and bake at 350°F for 20-24 minutes.  Cool completely before frosting.


Peanut Butter Swiss Meringue Buttercream (adapted from HTEAC)
(enough to frost 24 cupcakes generously, with some leftover)

1¼ cups packed dark brown sugar
4 egg whites
¼ tsp. salt
8 oz. unsalted butter, softened but still cool
½ cup creamy peanut butter

Place brown sugar, egg whites, and salt in a heat-proof bowl set over a pot of simmering water (double-boiler set-up).  Heat, whisking constantly, until mixture reaches a temperature of 160°F.  Take your time and bring the mixture up to temperature slowly; you'll know you're close when the mixture starts to get a little foamy.  Once mixture has reached 160°F, remove from heat and pour into the work bowl of your stand mixer.  Using the whisk attachment, beat the hot mixture on high for 5-7 minutes, until a marshmallow-type consistency is acheived. 

**Important:  Feel the sides of mixer bowl at this point.  It needs to be at room temperature before proceeding.  Chances are, it's still a bit warm.  160°F is pretty hot, so it may take some time to cool off. 

Once the sugar-egg mixture has cooled down, switch over to your paddle attachment.  With the machine running at medium-high, add the butter 1 Tablespoon at a time.  At some point during this process, the frosting might look curdled--that's okay.   Keep going and it should work itself smooth.  Once all the butter is added, continue beating until a thick frosting is formed.  I hate to use this phrase, but...you'll know it's done when you see it.  Your mixture will probably look loose and batter-like for the longest time, then as you're watching the mixer go and go for what seems like an eternity, in an instant it will transform to a thick & pipeable consistency.  When frosting is finished, add peanut butter and beat to incorporate. 

HELP!  The frosting never turned out for me :(
If the sugar-egg mixture is too warm and/or the butter is too soft when they are combined, the emulsion will never form and you'll get butter soup.  If this happens, don't freak out!  And whatever you do, DON'T toss the whole thing.  Stash the whole thing in the fridge for say, 15-30 minutes (depending on how liquidy your mixture is), or until the mixture has chilled and has thickened some.  You don't want it in there so long that it turns solid though.  Once it's chilled a bit, try beating it again.  This has worked for me in the past, so hopefully it does for you too.  Don't give up if it looks ruined!