Friday, July 31, 2009

Flavor-of-the-Month: Pie

Bake at 350

Since I had such a difficult time deciding what to make for July's Flavor-of-the-Month: Pie event hosted by Bridget of Bake at 350, I decided to make two pies. Funny thing is, both of my items are decidedly un-pie like in nature...but just as delicious. Visit Bake at 350 to check out all the yummy pie-goodness from the other participants (at bottom of the peach pie post)!

First up: Whoopie Pies

Find the recipe here on the King Arthur Flour website. If you can't find Dutch-processed cocoa at a decent price, I've found that Hershey's Special Dark® cocoa is a decent substitute. Marshmallow Fluff®, if you can find it, is worth seeking out as well. I followed the mini-pie variation, and ended up making 20 pies instead of 16. Don't worry though, these whoopies were plenty big!

And let's not forget the Boston Cream (Creme? Cream?) Pie:

Boston Cream Pie

  • Sponge Cake (Make TWO of these!) adapted from BHG
  • 2 eggs, room temperature
  • 1 cup all-purpose flour
  • 1 tsp. baking powder
  • 1 cup sugar
  • ½ cup milk
  • 2 Tbl. butter
  • 1 tsp. vanilla extract

  • Cream Filling
  • 1 pkg. (4-serving size) French Vanilla instant pudding mix
  • 1 cup milk
  • ¾ cup heavy cream

  • Chocolate Ganache
  • 6 oz. semi-sweet chocolate chips
  • ¾ cup heavy cream
  1. Preheat oven to 350°F. Grease a 10x2" round pan (or 9x9x2" square). Stir flour and baking powder together in a bowl and set aside.

  2. In a separate bowl, beat eggs on high speed until thick, about 4 minutes. Slowly add in sugar, beating on medium for 4-5 minutes or until light and fluffy. Add vanilla extract and flour mixture, beating on low speed just until combined.

  3. Heat milk and butter together until butter is melted. Add to batter and beat to combine. Pour into greased pan and bake immediately at 350°F for 20-25 minutes, or until done. Cake layer will be thin. Leave in pan to cool.

  4. Remove cake from pan once cooled, and prepare a second cake layer. While cakes are cooling, prepare chocolate ganache.

  5. Make ganache: Place chocolate chips into a medium bowl or large (3-cup) measuring cup. Heat cream to simmering point, then pour over chocolate chips. Do not stir. Let sit for 5 minutes, then stir slowly to incorporate. Set aside to cool, until slightly thickened but still pourable.

  6. Make filling: Whip ¾ cup cream by hand until stiff peaks form. Set aside. In separate bowl, combine pudding mix and milk. Beat/whisk for 2 minutes to thicken. Fold in whipped cream.

  7. Assemble cake: Place one sponge cake layer on serving plate. Spread with cream filling. Top with second cake layer. Pour ganache over cake, letting excess drip down sides. Use an offset spatula to spread ganache around sides of cake.

  8. Chill to set ganache before serving. Store in refrigerator.


Wednesday, July 29, 2009

Whoopies and Bostons and Pies, Oh My!

More details around noon on Friday...stay tuned!

Whole Wheat Dinner Rolls

Ever dream about those pillowy-soft rolls you get at chain restaurants and buffets?* I do (all the time!), and I'm on a quest to re-create their piping hot, plush goodness at home. I have a few dinner roll recipes in my arsenal of yet-to-be-tested items, and one of them was the dinner roll recipe I found on The Cupcake Project. I especially liked that they were baked in muffin tins. Not only are they cute, but the tin will contain a dough that is more slack (meaning you can use less flour and not have to worry about dough blobs spreading all over your pan. Less flour = softer, fluffier rolls) As you can see, I followed the wheat variation but ignored the words "whole wheat pastry flour" and opted for regular whole wheat flour. Bad call. While still wonderfully risen and delicious in its own right, using the wrong flour gave it a weird texture. Maybe there's a reason it calls for the pastry flour after all! This definitely calls for a "do over," but maybe this time I'll stick to plain white flour and see what happens.

*Like Texas Roadhouse and Ryan's, for example. Not that I ever go there. :D

Wednesday, July 22, 2009

My First Ever Round-Up!

Bake at 350

I'm pretty excited about joining the Flavor-of-the-Month round-up hosted by Bake at 350. This month's theme is PIE--something I rarely make or even eat, for no other reason than just plain laziness. And impatience. You have to wait several hours for a fruit pie to cool down before you can cut it. Oh, the agony! Anyway, I was thinking of something more along the lines of an oatmeal pie (like the pre-packaged ones...you know which ones!) or a whoopie pie. Oooh, a homemade version of a Moon Pie® would be good. Decisions, decisions.

Check back at the end of the month for my entry. In case you're unfamiliar with round-ups/blog carnivals (as Bake at 350 calls them. So cute!), they go something like this: Someone (Bake at 350 in this case) hosts the event and posts a theme, such as "pie", along with a deadline. People wishing to participate post their entry on their own blogs, along with a link to the host's blog. That way, you can visit the host's blog and browse through the links of everyone who joined in that month. Fun, huh? It's a great way to see everyone's handiwork and find blogs you wouldn't otherwise stumble across!

Saturday, July 18, 2009

Banana Nut Muffins

I've never met a banana bread I didn't like. Nuts, no nuts, cinnamon-spiced, or pure banana, there aren't many ways you can go wrong! It seems everyone and their mama has a secret recipe for the "best ever" banana bread. My current recipe? Not secret. But "best ever?" Who knows? Make them for your family & friends and find out. These babies are big enough to share. But why would you want to?


Banana Nut Muffins (adapted from Cooks Illustrated)

  • 2 cups flour
  • ¾ cup sugar
  • ¾ tsp. baking soda
  • ½ tsp. salt
  • 1 cup chopped walnuts, toasted
  • 1½ cups mashed ripe bananas (about 3)
  • ¼ cup sour cream
  • 2 eggs
  • 6 Tbl. melted butter
  • 1 tsp. vanilla extract
Preheat oven to 350°F. Place paper liners into 6 to 9 jumbo muffin cups (I made 9, but as you can see from the photo, they did not rise to the top. Hence, no "muffin top" to gnaw off.) or grease & flour, if that's your thing.
Combine dry ingredients (walnuts too!) in large bowl and set aside. Combine all wet ingredients in a separate bowl and whisk to blend, taking care to incorporate the eggs. Pour wet mixture over the flour mixture and stir only to combine. Use as few strokes as possible to avoid the dreaded Tough Muffin Syndrome. It will make you sad. Portion into prepared baking cups and bake at 350°F for 25-30 minutes, or until lightly golden and done. Remove to wire racks to cool.

Thursday, July 16, 2009

"C is for cookie, that's good enough for me..."

Peanut butter. Oats. Chocolate chips. M&M's®. Add 'gargantuan size' to that list and you've got yourself a pretty hefty, appropriately named Monster Cookie*. Around October of last year I received a free Betty Crocker® 2009 Calendar, complete with monthly recipes. Always one to be dazzled by pretty pictures, I was just itchin' to make August's recipe for Easy Monster Cookies. What really caught my eye (aside from the bright, cheery photo) was the recipe's use of not one, but TWO pouches of cookie mix--a product I've seen plenty of times but had yet to try.

The cookie mixes made fast work out of dough prep, and baking time was quick too--3 pans of 6 cookies each baked for about 14 minutes apiece. You'll want to leave plenty of spread room for these, as they grow considerably in size. Don't believe me? Check it out:


*I've seen Monster Cookies that include raisins and/or nuts in the mix too!

Friday, July 10, 2009

"I want sprinkles."

Just in case you forgot: it's hot outside. You can almost hear the collective groan throughout Acadiana when the weather man announces the heat index is forecast at 107°F. On days like this (which has been nearly every day, it seems) a big salad for dinner sounds really nice, since heating anything up in the kitchen would be insanity. It's just too hot to bake. And yet it's during these times that I feel an inexplicable stirring within my belly, urging me to "Bake something." Nine times out of ten, I give in.

It's a good thing my pantry is usually stocked with a good selection of baking ingredients, because it was definitely too hot to make a grocery store run. (I buy an embarrassingly large amount of cake mix when they go on sale. Last year I was able to hit up a great deal: 2/$1.00!) Today I wanted something simple and classic, like a yellow cupcake. Topped with chocolate frosting. And sprinkles. Definitely sprinkles. Maybe chocolate cupcakes too.

So...here we go! Yellow cake mix? Check. Devil's Food cake mix? Check. Eggs? Sour cream? Oil? Check, check, and...check. Butter? No. Powdered sugar? Oh snap. I can't make frosting. No worries though--armed with a single can of chocolate fudge frosting (canned!?! Yes, and I'm not ashamed.) and a tub of Cool Whip® I can make enough frosting for TWO batches of cupcakes. Score!

*Bonus points if you can name the site from which I swiped my post title


Fluffy Chocolate Frosting (enough to frost 48 cupcakes!)
  • 16 oz. can Chocolate Fudge frosting (or desired flavor)
  • 8 oz. tub Cool Whip® non-dairy topping, thawed

Empty frosting into a large-ish bowl. Add a spatula-full of whipped topping to the frosting and gently fold in. If ever there was a time to be dainty, this is it. You don't wanna deflate your puffy frosting now, do you? Continue adding whipped topping gradually, gently folding as you go. Done!

Saturday, July 4, 2009

Cheese Straws

Left: Smokey Ranch Straws; Right: Cheddar Straws

Ah, cheese straws. Deliciously addictive and simple to make, these party snacks are definitely not diet food. As a British article so eloquently put it,

"Maligned by some as dull, the cheese straw is in fact, and quite correctly, pre-eminent among canapés. Its glowing, golden complexion can entice and it brings with it a message of comfort and wholeness. It rises above the one-bite rule and can be waved around and used to drive home important conversational points." (Source)

Yeah...I guess in Britain it's not a party until cheese straws get waved around!

Cheese Straws (adapted from Paula Deen)

  • ½ cup butter, cut into 16 pieces
  • 8 oz. extra-sharp cheddar cheese, grated
  • 1½ cups all-purpose flour
  • 1 tsp. salt
  • ½ tsp. cayenne pepper*

*Original recipe calls for ¼ teaspoon. I upped it to ½ teaspoon but did not find it to have any heat at all. Maybe my taste buds aren't working, but I'll definitely try ¾ teaspoon next time. There are recipes out there which use a full teaspoon of cayenne, so adjust according to your tastes.

Combine all ingredients in bowl of food processor. Pulse in 5-second increments to get things going, then run food processor until smooth dough forms. At this point, the dough will be soft and workable. You may choose to hand roll the dough into sticks or use a cookie press/pastry bag to pipe out pretty ridged straws of dough (Bake at 350°F for about 15 minutes or so). If you're lazy like me though, shape the dough into a rectangle, place in quart-sized plastic zip top bag, and chill until firm.

Preheat oven to 350°F. Slice chilled dough into desired sized sticks (I got around 4 dozen) and place on foil lined cookie sheets. Bake at 350°F for 15-20 minutes. Cool on wire rack and serve at room temperature. Be careful when using them to point during conversation.

To make an equally delicious smokey ranch version, use your favorite breed of smoked cheddar cheese and chipotle chili powder in place of regular cheddar and cayenne. Omit the salt and use a 1-ounce packet of dry ranch dressing mix instead. Yum!

Thursday, July 2, 2009

Apple Pie Casserole...à la Mode

Uh...what? You're probably scratching your heads at the post title, wondering just what in the heck that could be and "where's the picture?" Sorry for not capturing any photos of this delight; I'll try harder next time, I promise!

Ice cream sandwich cakes/casseroles are gaining popularity these days, owing to their ease of preparation and potential for variations. The classic ones involve ice cream sandwiches layered with some type of syrup (chocolate, caramel, strawberry--take your pick), maybe some nuts or toffee bits, more ice cream sandwiches, and topped off with whipped topping and garnish. Neapolitan ice cream sandwiches + sliced bananas + whipped topping + cherries = banana split! The possibilities are endless!

My original intention for this casserole involved lining up ice cream sandwiches and layering them with apple pie filling, caramel sauce, and whipped topping. However, after a fruitless three-store search I was unable to find any vanilla wafered ice cream sandwiches. Am I dreaming here, or do they only make the chocolate wafer-vanilla middle variety? I could swear I've seen vanilla-vanilla at some point. For this recipe I suggest seeking out a small-diced apple pie filling...big frozen apple chunks can be hard to handle!


Apple Pie Casserole à la Mode
  • 24 cinnamon graham cracker sheets
  • ½ gallon vanilla ice cream, softened*
  • 21 oz. can apple pie filling
  • 1 tsp. apple pie spice (optional)
  • 12 oz. jar caramel sauce
  • 8 oz. non-dairy whipped topping, thawed

Free up some space in your freezer to hold a 9 x 13" baking dish. This next part is messy, so wash your hands first. Pour apple pie filling into a medium bowl. Fish out apple slices, leaving behind as much of the gel part as possible in the bowl, and chop into small pieces. Return apple pieces to bowl with pie filling gel and stir in apple pie spice, if using. Wash those goopy hands!

Begin layers in the 9 x 13" dish:

  • graham crackers
  • ice cream
  • graham crackers
  • apple pie filling
  • caramel sauce
  • graham crackers
  • ice cream
  • whipped topping

Freeze uncovered for about 15 minutes, or until whipped topping has hardened. Cover with foil and store in freezer until serving time. Serves 24.

*If you live anywhere in the South, I highly recommend you seek out and purchase a tub of Blue Bell Homemade™ Vanilla Ice Cream. Once you've tried it, nothing else will do!

A Fourth of July BBQ Must-Have

When the humidity is 70% and temperatures flirt with the 100-degree mark, firing up the oven probably isn't the smartest thing to do. Instead, make yourself a refreshing bowl of fruit salsa. This recipe isn't like your typical fruit salsa, which may contain savory elements (i.e., veggies). Think of it as a fruit salad, only diced smaller for ease of scooping. It's super duper easy and certainly customizable! The hardest part is the prep work, but if you're like me and like chopping things you'll have a blast :)

I've taken this salsa to two separate venues with rave reviews each time. As I like to say, it's "Man tested, carnivore approved!™"


Fruit Salsa (inspired by this recipe)
  • 1 pint blueberries
  • 1 lb. strawberries
  • 2 mangoes
  • 3 nectarines
  • 4 kiwis
  • 2 apples (1 golden delicious & 1 granny smith)
  • 20 oz. can pineapple in juice!
  • 3 Tbl. peach preserves
  • 2 Tbl. sugar
  • 1 Tbl. brown sugar (sugar may be adjusted according to ripeness of fruit)
  • cinnamon and/or regular graham crackers for serving

Start by chopping apples. A handy hint for keeping your apples from turning brown: Drain pineapple juice from the can into a medium bowl, and as you chop the apples throw them into the juice to soak. Chop pineapple next and mix with chopped apples. Let apples & pineapple soak together while you finish prepping the remaining fruits. Drain before using. The acidity will preserve the apples without affecting the taste as much as sprinkling them with lemon juice, which is traditionally used.

In a large bowl, gently fold together drained apples, pineapple, nectarines, mangoes, and kiwi. Add preserves, sugar, and brown sugar, mixing well. Gently fold in strawberries and blueberries, taking care not to break them up too much and discolor the salsa. Chill before serving. I know that seems like a lot of fruit and a whole lot more chopping, but you can certainly make bigger cubes and/or change it up to include your favorite fruits and preserves.

Wednesday, July 1, 2009

Happy Birthday, America!

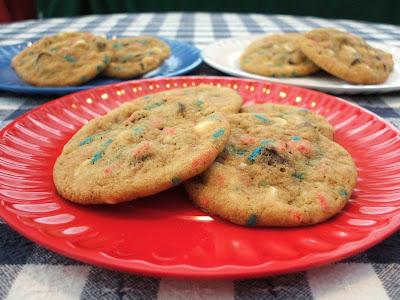
What? No birthday cake? Cake is great and all, but there's not much (besides apple pie) that can top the all-American chocolate chip cookie for this occasion. Here's a super special chocolate chip cookie just for you, my fellow Americans. You want chocolate chips? You got 'em. White chocolate too? Okay. And sprinkles? Sure, why not? We ARE celebrating our Independence!

The quest for the perfect chocolate chip cookie recipe is neither new nor simple. Debates could go on for ages without ever reaching a consensus on what exactly constitutes chocolate chip cookie perfection. Chewy, gooey, crispy, cakey, puffy, chips, chunks, nuts, no nuts--the variations are endless. Where's a gal to start? For this experiment, I thought it might be best to stick with a basic recipe (i.e. the Nestlé Toll House® standard 'back of the bag" formula) and add a few tweaks. I also turned to the (not-so-top-secret) secret that's been causing quite a buzz in the food blogging world. It began with the famous New York Times article which reveals this simple tip: refrigerate your cookie dough for 24-36 hours before baking. (Hey, no one said it would be fast. Or easy.) Apparently this serves two purposes:
  1. It allows the flour plenty of time to hydrate, creating a better cookie texture
  2. It deepens and complexifies (I just made a new word, yay!) the flavors

Armed with two bags of chips and this handy dandy tip, I set off to baking (or rather, to prepping the dough for two days later) my cookies. Was it worth the wait? Did chilling the dough for 36 hours really produce insanely delicious and perfect cookies? You bet it did. It's difficult to describe exactly what about the flavor was different; I could only detect that it was somehow...better. It was definitely interesting to see what effect this method had on the Nestlé recipe because I seldom use it. Next time I'll revert to my go-to recipe and see what 36 hours in the fridge can do to improve it. I bet it will be Ah-maze-ing!


Festive Chip Cookies (Adapted from the classic Nestlé recipe)

  • 1 cup (2 sticks) butter, softened
  • ¾ cup brown sugar
  • ¾ cup granulated sugar
  • 1 tsp. salt
  • 2 eggs
  • 1½ Tbl. vanilla extract
  • 1 tsp. baking soda
  • 2¼ cups all-purpose flour
  • 1 cup semisweet chocolate chips
  • 1 cup white baking chips
  • 3 oz. multi colored jimmies (sprinkles)

Cream butter, brown sugar, and granulated sugar together until light and fluffy. Beat in salt, eggs (one at a time), and vanilla extract until creamy and incorporated. Gradually beat in flour and baking soda, beating only to combine. Stir in chips and sprinkles. Scoop out portions of dough. Cover and refrigerate for 24-36 hours.

Preheat oven to 375°F. Bake chilled dough for 11 to 13 minutes or until golden brown. Cool on baking sheets for 2 minutes; remove to wire racks to cool completely.

Recipe Notes:


  1. The original recipe yield is 5 dozen. I normally get between 4 and 4½ dozen because I like a bigger cookie. (Duh!)

  2. Use salted butter for this one. Many bakers use only unsalted butter in cookies, but since the original Toll House® recipe gives you the option of butter OR margarine (which is salted), I think the cookie can handle it. Besides, you almost need the salt to counter the extreme sweetness from the white baking chips.

  3. Yes, that really DOES say 1½ Tbl. As in "one and a half Tablespoons" of vanilla extract. It really boosts the flavor--but not so much that the vanilla smacks you in the face.

  4. I found it easier to scoop the dough before refrigerating rather than after, since 36 hours in the chill box will really harden it up. Just make sure you have a suitable container (and fridge space) in which to stash your dough balls for a day and a half. Also be sure to have some type of theft-deterrent device installed to ward off the raw cookie dough lovers in your household :)

  5. Why use 3 ounces of sprinkles? Isn't that just overkill? Ummm....no. One can never have "too many sprinkles." It's just an arbitrary amount I came up with--I threw in a whole tub of sprinkles, which happened to be a 3 oz. (about ½ cup) container. Use as many or as few as you'd like.

  6. And aren't sprinkles like, really expensive? Not if you check out the $1 section at Target!