Wednesday, April 28, 2010

Butter Chicken, Revisited


Yum.  My second attempt at Murg Makhani (aka Butter Chicken) yielded better results than my first go 'round, which was mighty delicious to begin with.  For those unfamiliar with the more exotic flavors found in Indian cuisine, this recipe is a wonderfully tame way to get more acquainted.  Wanting a bolder flavor?  Check out my revisions below, in which I doubled the amount of all the spices (aside from the cayenne, which only got a 50% boost).  Using half the amount of cream serves not only to lighten the dish but also allows the flavors to really shine through.  You could certainly use chicken breasts as originally called for, but I prefer thighs for their more robust flavor.  Enjoy!

(Next time I'm definitely trying out the Murg Makhani recipe by Faith of An Edible Mosaic.)


Butter Chicken (Serves 6)
Adapted from lillieknits on Tasty Kitchen

1½ lbs. boneless, skinless chicken thighs
5 cloves garlic, minced
1 tsp. salt
1 tsp. black pepper
¾ tsp. cayenne pepper**
½ tsp. ground coriander
½ tsp. ground cumin
½ tsp. ground cardamom
1 whole lime, juiced

1 whole onion, diced
4 Tbl. butter
1 can (14.5 oz.) tomato sauce
1 can (14.5 oz.) petite diced tomatoes, undrained
 8 oz. whipping cream

chopped cilantro, to taste
1½ cups Basmati rice

**can be reduced according to level of heat desired.  Original recipe calls for ½ teaspoon, and the author notes the recipe is a little spicy and can be made with less cayenne.  I didn't detect much heat in the original version, so I added more.  Use your judgment.

Chop chicken into 1-inch cubes and place in a 1-gallon plastic zip-top bag.  Add garlic, salt, black pepper, cayenne, coriander, cumin, cardamom, and lime juice.  Close bag and knead bag to evenly distribute ingredients.  Place in refrigerator to marinate overnight.

SautĂ© the onion in the butter until soft.  Add marinated chicken and cook about 5 minutes.  Add the tomato sauce and diced tomatoes.  Cook for 30 minutes over medium-low heat with the lid on.  Meanwhile, prepare Basmati rice according to package directions.  Add the whipping cream and cilantro to the chicken just before serving over cooked rice.

Monday, April 26, 2010

My Girl, Paula: Baked Spaghetti


Better late than never, here's my one and only entry this month for the My Girl, Paula! cooking group:  Baked Spaghetti.  (This recipe made its appearance in the June 2009 recipe line-up--a few months before I joined the group.)  I can't give this one an honest review because I made more than a few changes to the recipe, but I can say that I will definitely be making this one again.  Below you'll find my modified version of the recipe.


Baked Spaghetti  (Serves 8)
Adapted from Paula Deen

Sauce:
15 oz. can tomato sauce
29 oz. can petite diced tomatoes, undrained
2 cloves garlic, minced
½ cup diced green bell pepper
½ cup diced onion
¼ cup chopped fresh parsley
1 tsp. salt
¼ tsp. garlic powder
¼ tsp. onion powder
¼ tsp. black pepper
1½ tsp. seasoned salt
1½ tsp. Italian seasoning
2 small bay leaves
2 tsp. sugar
6.5 oz. can mushroom pieces (4 oz. net drained wt)

¾ lb. lean ground beef (93%)
8 oz. angel hair pasta
8 oz. shredded Cheddar Jack cheese blend

Combine all sauce ingredients in large pot; bring to a boil over high heat.  Reduce heat and allow to simmer for 1 hour, stirring occasionally.

Crumble the ground beef in a skillet.  Cook over medium-high heat until fully cooked, with no pink color remaining.  Drain the fat from the meat, and then add the ground beef to the sauce.  Simmer for 20 more minutes.  Meanwhile, cook pasta according to package directions.

Preheat oven to 350°F and grease a 9 x 13" casserole dish.

Cover the bottom of casserole dish with one-third of the sauce.  Layer half of the cooked pasta over the sauce.  Sprinkle with one-third of the cheese.  Repeat layers once.  Top with remaining sauce (save the last third of the cheese for later).  Cover casserole with foil and bake at 350°F for 30 minutes.  Uncover casserole and sprinkle with remaining cheese.  Return to oven and continue to cook until the cheese is melted and bubbly, about 5 more minutes.  Allow to rest for at least 5 minutes before cutting into squares and serving. 


So...how far did I stray from the original recipe?

Tomatoes.  "2 cups canned diced tomatoes."  Is that drained or undrained?  The recipe didn't specify, and it calls for water as well--adding to the confusion.  I wasn't sure what to do so I used a 29 oz. can of undrained petite diced tomatoes and omitted the water.

- Sugar.  I increased the amount slightly to compensate for the extra acidity from the larger quantity of tomatoes that I left undrained.

- Seasonings.  Instead of listing Paula's House Seasoning, I went ahead and listed the individual components, along with some onion powder I added.

- Meat.  By switching to a 93% lean ground beef, I was able to slim down the recipe somewhat.  Leaner cut = More $$$.  Solution?  Use half the amount called for and add some vegetables (in this case, mushrooms) to fill out some of the bulk. 

- Cheese.  I thought it would be easier to buy an 8 oz. bag of pre-shredded Cheddar Jack cheese than to use 1 cup of each of shredded cheddar and monterey jack.  Was the Cheddar Jack a 50:50 blend?  Probably not, but no one was complaining!

Friday, April 23, 2010

Cupcake Hero::April


Coming up with a recipe for Cupcake Hero is always a challenge, not to mention a task I normally put off until a few days before the deadline.  So when Clara of I ♥ Cuppycakes announced that April's Cupcake Hero theme would be anything from the books Hello, Cupcake! or What's New, Cupcake? by Karen Tack and Alan Richardson, AND pushed the deadline back to the 25th, I knew I had no excuses NOT to conjure up some awesome entries!  Winners for this month will be chosen randomly, based on the order in which the photos were submitted to the group's Flickr pool.


I'd previously made the Owl Cupcakes from Hello, Cupcake!, so I had a pretty good idea of what to expect from new book, What's New, Cupcake?  Expectations = Met.  Our local library had two copies on the way, so my (wonderful!) boyfriend Mike put himself on the waiting list for the book.  By the time I got around to thumbing through the book, he'd already bookmarked a dozen or so cupcakes he wanted to try his hand at!  After much deliberation, we finally narrowed it down to these five (based on cuteness, ease of preparation, and the let's-not-buy-tons-of-candy-we'll-only-use-once factor):


This was hands-down my favorite Cupcake Hero theme so far.  Not only were the cupcakes easy to make (thanks to the detailed instructions in the book), but I got to spend an afternoon in the kitchen with my boyfriend--who, on top of being incredibly thoughtful and sweet, is also a baker.  Yes, ladies...be very jealous.  ;)

Here are our entries:

A Rose is a Rose
These were made by rolling fruit slice candies flat with a rolling pin (use granulated sugar to help with stickage).  Each rose was formed from three flattened candies rolled into spirals.

*   *   *   *   *   *   *   *   *   *

Bake Sale Pies
I used cherry flavored dried cranberries for the "pie filling" instead of the red M&Ms® pictured in the book, piling them gently on top of a frosted cupcake before decorating with cocoa-tinted frosting.  Mike did a much better job piping the pie crust than I did; that's why mine is hiding in the background :)

*   *   *   *   *   *   *   *   *   *

Mum's the Word
This design was the easiest to make, and produced the best results for the amount of time invested.  The flower petals were formed by cutting mini marshmallows in half diagonally with a pair of scissors, then dipping the sticky cut side into colored sugars.  Using the colored mini marshmallows instead of regular was all Mike's idea.  Good call on that one!

*   *   *   *   *   *   *   *   *   *

Chinese Fortune Cookies
The cookies were made by heating up two caramels (very briefly!) in the microwave to soften them up before shaping them into discs.  The caramel discs were then folded into little fortune cookie shapes--but not before we each inserted fortunes that we wrote for each other! 

Note for next time:  use waxed or parchment paper instead of plain ole' white paper for the fortunes to avoid the sticky, paper-tearing mess we encountered when trying to retrieve our fortunes. 

*   *   *   *   *   *   *   *   *   *

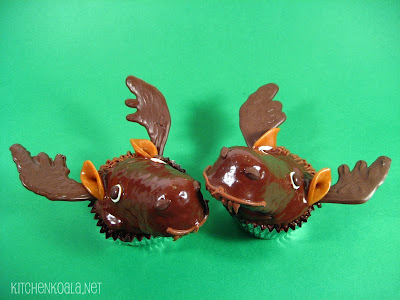
Chocolate Moose
We had the most fun making these!  I'm SO glad I took photos after we made them instead of waiting for some good sunlight the next day, because they didn't survive the night!  Probably due to user error on our part, the decorations proved too heavy to withstand the forces of gravity!  And an interesting note:  those caramel ears melted.  I expected them to get dried out and brittle.  Instead, I was greeted with caramel puddles dripping from the moose heads (*sob*) when I looked in my cake caddy the following day.

As you could probably guess, the moose heads were constructed from Twinkies®, cut on the diagonal and anchored to the cupcake with frosting.  Following a brief stay in the freezer, the snack cake-topped cupcakes were dipped into melted frosting (ooh, shiny!) and allowed to set.  Antlers and nostrils were piped from Candy Melts® onto waxed paper, then placed on the finished cupcake.  Miniature M&Ms® finish off the eyes.

*   *   *   *   *   *   *   *   *   *

And there you have it, folks--the fruits of one very fun-filled Saturday afternoon in the kitchen with my sweetie.  There's still time for you to enter the contest, so run to your nearest book store or library to pick up copies of Hello, Cupcake! and What's New, Cupcake? today! 

Deadline to enter April's Cupcake Hero is Sunday the 25th, so get to it!

Wednesday, April 21, 2010

Chocolate Chip Cookie Cake

A most excellent late night/early morning snack, perfect for those post-bachelorette party nights on the town.


Cookie cakes are also a good choice for celebrating your sweetie's father's birthday.  Only regret:  not enough icing!

$35.18. That's how much "that cookie place in the mall" (you know which one) charges for a large pan-sized cookie cake. Not exactly a budget-friendly treat, especially considering all the belt-tightening we've all been doing these days. But good news, everyone: you can make equally tasty cookie cakes at home for the fraction of the cost! All you need is the standard back-of-the-bag chocolate chip recipe and a secret ingredient that helps the cookie stay soft after baking: light corn syrup.

The dough will be quite loose, almost batter-like in consistency...


...so make sure to leave room for growth, or it will surely begin climb out of the pan as it bakes.


Chocolate Chip Cookie Cake  (Yield: one 13 x 18" pan)
Adapted from Southern Plate and NestlĂ©® recipes

1 cup unsalted butter, softened
1 cup light brown sugar
½ cup light corn syrup
2 eggs
2 tsp. vanilla extract
2¼ cups all-purpose flour
1 tsp. salt
1 tsp. baking soda
12 oz. semisweet chocolate chips

Preheat oven to 325°F.  Generously grease a 13 x 18" rimmed cookie sheet (I used one 9 x 13" pan and one 12" round pizza pan).

Cream butter and brown sugar together until fluffy.  Blend in corn syrup, eggs, and vanilla until incorporated.  Add flour, salt, and baking soda to creamed mixture, and mix to combine.  Dough will be soft and moist.  Stir in chocolate chips. 

Spread cookie dough into prepared pan(s), leaving a one-inch border between the dough and edge of pan.  This gives the dough room for expansion as it bakes, resulting in a flatter cookie cake with minimal "curbing" at the edges.  You may find it helpful to use damped fingers to pat out the sticky dough.  Bake in 325°F oven for 30-45 minutes, depending on size and thickness (it took 28 minutes to bake both the 9 x 13" pan and 12" pizza pan).  Cool completely before decorating.


White Decorator Frosting
Adapted from Christy Jordan

1 cup shortening
pinch of salt
3-5 Tbl. water
1½ tsp. clear vanilla extract
¼ tsp. butter flavoring
1 lb. powdered sugar (approx. 3¾ cups)
1 Tbl. meringue powder

Combine shortening and salt in a mixer bowl and cream together on low speed using the whisk attachment.  Add water (start with 3 Tablespoons), extracts, meringue powder, and about one-third of the powdered sugar.  Mix on medium-low speed until combined, scraping bowl as needed.  Reduce mixer speed to low and slowly add the remaining powdered sugar while mixing.  If frosting seems to dry or thick, add more water.  Once all the sugar has been added, increase speed to medium-high and beat until light and fluffy.

Monday, April 19, 2010

Bandwagon Jumping: Sugar Cookie Bars


 Is it just me, or have Sugar Cookie Bars been popping up all over the internet lately?  The first wave of blog postings about this recipe seems to have appeared around February-March 2009, with a recent resurgence in popularity.  Always late to join the party, I finally got around to baking up a batch--just to see what all the fuss is about.  The appeal:  frosted sugar cookie goodness, without all the work of forming individual cookies (not to mention the mega batch size).  They were a smashing success at my workplace, drawing many comparisons to the famed Lofthouse® frosted sugar cookies.  While I'm not completely sold on the comparison, I can understand why people go nuts over them.  Like a Lofthouse® cookie, these sugar cookie bars start off with that pale, almost raw floury flavor...then follow up with an intense sugary kick. 

I didn't have much luck tracing the origins of this recipe, but most bloggers source The Repressed Pastry Chef, who in turn credits Anissa's Kitchen.  After contacting Anissa, I learned that she received the recipe from a friend (and so on, and so on).  My search came to a dead end.  Any one out there know the originator or source of this recipe?  Curious minds want to know :)


Sugar Cookie Bars (Yields one 13 x 18-inch pan*)
Adapted from Anissa's Kitchen

1 cup butter, room temperature
2 cups sugar
4 eggs
2 tsp. vanilla
5 cups all-purpose flour
1 tsp. salt
½ tsp. baking soda

Preheat oven to 375°F.  Grease a 13 x 18-inch half sheet pan with non-stick spray (I lined my pan with foil, then greased the foil).

Cream butter and sugar until fluffy.  Add eggs, one at a time, beating well after each egg.  Add vanilla and mix well.  Combine flour, salt, and baking soda in a separate bowl and whisk to combine.  Add to creamed mixture and mix until just combined.  Press evenly into prepared pan (it helps to use damp fingers).  Bake at 375°F for 10-15 minutes or until light golden brown and a toothpick inserted in the center comes out clean.  Cool completely before frosting.


Frosting
1 cup butter, softened
1 tsp. vanilla
pinch of salt
4 cups powdered sugar (I used 1 lb., approx. 3¾ cups)
5 Tbl. milk (I used 3 Tbl. heavy cream)
Food coloring, if desired
Sprinkles (pretty much a requirement)

Combine butter, vanilla, and salt in mixer bowl.  Using whisk attachment, beat until creamy and combined.  Add about one cup powdered sugar, then mix to combine.  Add milk or heavy cream (start with 3 Tablespoons; you can add more later) and beat to incorporate.  With mixer running at low speed, slowly add remaining powdered sugar.  (You can add more liquid at this point, if needed).  Once sugar has been added and mixed in, beat frosting on medium-high speed for 1-2 minutes or until light and fluffy.  Blend in food coloring, if desired.  Frost cookies, then top with sprinkles before cutting and serving.  (For ease of cutting, I recommend placing the pan in the fridge for a quick chill to set the frosting.)

* You can cut these as big or small as you want...I cut them into 90 small bars, but I've seen others cut them into 32, 48, or 60 pieces.

Monday, April 12, 2010

A Classic Birthday Cake

Happy Birthday, A.! Hope you enjoyed your cake :)

Experimenting with fun flavor combinations is always an adventure, but sometimes you just want a back-to-basics, tried-and-true favorite.  Enter what I like to call the "classic" birthday cake:  yellow cake layers surrounded by a nice blanket of chocolate frosting.  This perennial favorite is made easier thanks to an ingenious preparation technique from the folks at Cook's Country: a make-ahead, freezer-stable cake mix.  When you're ready to bake, throw in a couple of room temperature eggs and some warm water, and you're minutes away from tender, buttery, yellow cake goodness.  Iced and edged with a simple border, this cake is the perfect canvas for your favorite decorations--be it sprinkles, fresh strawberries, or a circle of birthday candles.

(Edited to add)  When making the chocolate frosting, the temperature of the melted chocolate is more vital than you'd think!  Apparently my chocolate and/or butter was too cool when I began the whipping process, giving the frosting a chocolate chippy appearance as the chocolate combined with cool butter and ice cold heavy cream.  Not an altogether bad result, just something to keep in mind if uniformity is important.


Make-Ahead Yellow Cake Mix 
From Cook's Country April/May 2010

2 cups granulated sugar
1½ cups all-purpose flour
1½ cups cake flour
½ cup nonfat dry milk powder
1 tablespoon baking powder
1 teaspoon salt
16 tablespoons unsalted butter (2 sticks), cut into ½-inch pieces and chilled
1 tablespoon vanilla extract

Process sugar, flours, milk powder, baking powder, and salt in food processor for 15 seconds to combine.  Add butter and vanilla and pulse until mixture resembles coarse meal.  Freeze in zipper-lock bag for up to 2 months.

TO MAKE TWO 9-INCH LAYERS:
1.  PREPARE PANS  Adjust oven rack to middle position and heat oven to 350 degrees.  Grease and flour two 9-inch round cake pans (see below for other pan options).

2.  MAKE CAKE  With electric mixer on medium speed, beat prepared cake mix, 1¼ cups warm water (about 110 degrees), and 2 large room temperature eggs until mixture is smooth, about 2 minutes.  Scrape batter into prepared cake pans and bake until toothpick inserted in center comes out clean, 30 to 35 minutes.  Cool cakes in pans 10 minutes, then turn out onto wire rack.  Cool completely, at least 1 hour.

OTHER PAN OPTIONS AND BAKE TIMES:
Two 8 by 8-inch cake pans: 30 to 35 minutes
One 13 by 9-inch cake pan: 35 to 40 minutes
One 12-cup Bundt pan: 40-45 minutes
24 cupcakes: 20 to 25 minutes


Chocolate Frosting   (Makes about 4 cups)
From Cook's Country April/May 2010

20 tablespoons (2½ sticks) unsalted butter, cut into pieces and softened
3 tablespoons heavy cream
2½ teaspoons vanilla extract
8 ounces semisweet chocolate, melted and cooled
¼ teaspoon salt
3 cups confectioners' sugar
3 tablespoons cocoa

1.  CREAM BUTTER  With an electric mixer fitted with whisk attachment, beat butter, cream, vanilla, chocolate, and salt on medium-high speed until combined, about 1 minute.

2.  WHIP FROSTING  Reduce mixer speed to medium-low.  With motor running, slowly add confectioners' sugar and mix until smooth, 1 to 2 minutes.  Increase speed to medium-high and beat frosting until light and fluffy, about 5 minutes.

Wednesday, April 7, 2010

Cherry-Almond Coffee Cake

Today, April 7th, is National Coffee Cake Day...honest!  What a happy little coincidence. :)


Any recipe that passes off a delicious pastry as breakfast fare is a winner in my book.  There's no better way to start off your day than with a hearty serving of cake, complete with tart cherries, sweet crunchy struesel and icing.  But why save it for breakfast?  This coffee cake is so good you'll want to savor it at all hours of the day! 

Recipe Notes:
  • I made two of these this past weekend (one to eat, one to share), and a single batch of glaze was plenty to cover both cakes with a fairly tight icing lattice.  Plan on using less than half the amount of glaze called for in the recipe; I suspect the ingredient amounts reflect the recipe writers' reluctance to use the less common 1/8 teaspoon measure. 
  • If (and that's a big "IF") you don't think you can finish the whole thing within 3 days, it stores well in the fridge.  The streusel will soften and become quite moist, but five days later my chilled coffee cake is still as soft and tasty as it was on Day One!
  • The 8 to 12 serving size produces generous slices of pure coffee cake heaven; I cut mine into 16 daintier pieces. 

Cherry-Almond Coffee Cake  (Serves 8 to 12)
From Cook's Country April/May 2010

CHERRY FILLING
2 (15-ounce) cans tart cherries
¼ cup granulated sugar
2 tablespoons cornstarch

STREUSEL AND CAKE
2½ cups all-purpose flour
½ cup granulated sugar
cup packed light brown sugar
½ teaspoon salt
7 tablespoons unsalted butter, melted, plus
8 tablespoons (1 stick) unsalted butter, softened
1 (7-ounce) tube almond paste, crumbled into small pieces (about 2½ cups)
1½ teaspoons baking powder
cup sour cream
2 large eggs
1 teaspoon vanilla extract
1 teaspoon almond extract

ALMOND GLAZE
1 cup confectioners' sugar
2 tablespoons water
¼ teaspoon almond extract

1.  COOK CHERRIES   Bring cherries (with their syrup), sugar, and cornstarch to simmer in large saucepan over medium heat.  Mash cherries with potato masher and cook until thick and jamlike, about 25 minutes (mixture should measure 2 cups).  Refrigerate until cool, about 30 minutes.

2.  MAKE STREUSEL   Whisk 1¼ cups flour, ¼ cup granulated sugar, brown sugar, and ¼ teaspoon salt in medium bowl.  Using fork, stir in melted butter until mixture forms pea-size pieces.  Stir in ½ cup almond paste; set aside.

3.  MAKE BATTER   Adjust oven rack to middle position and heat oven to 350 degrees.  Grease and flour 13 by 9-inch baking dish.  Combine remaining flour, baking powder, and remaining salt in medium bowl.  Whisk sour cream, eggs, and extracts together in small bowl.  With electric mixer on medium-high speed, beat remaining almond paste, remaining sugar, and softened butter until light and fluffy, about 2 minutes.  Add sour cream mixture and beat until incorporated.  Reduce speed to low and add flour mixture, mixing until just combined, about 1 minute.  Return speed to medium-high and beat until fluffy, about 1 minute.

4.  BAKE CAKE   Scrape batter into prepared dish.  Dollop cooled cherry mixture over batter and spread into even layer.  Sprinkle streusel over cherry mixture and bake until toothpick inserted in center comes out clean, about 30 minutes.  Cool cake completely, about 2 hours.

5.  GLAZE CAKE   Combine sugar and extract with 2 tablespoons water.  Drizzle over cake.  Serve.  (Cake can be kept at room temperature, covered in plastic wrap, for 3 days.)

Tuesday, April 6, 2010

Vegetable Pot Pie Filling

Greetings, dear readers.  I truly hope you and your families had a blessed Easter!

(Today's recipe was originally intended to be posted during my Lenten "Meatless Fridays" feature, but it managed to slip by without being published.)  

It was "love at first bite" when I tried the Chicken Pot Pie recipe by Sunday Baker, and even more so because I knew the recipe could easily be adapted for a vegetarian meal.  Swap out mushrooms and potatoes in place of the chicken, and you've got yourself a hearty and comforting meatless meal.  To streamline the recipe, I opted to forgo baking the pies (heck, I got rid of the pie crust altogether) because the filling itself is a fantastic stand-alone recipe.  Serve with rice, pasta, rolls, or better yet--biscuits--to round out the meal.  (That's a Cat Head Biscuit pictured above)


Vegetable Pot Pie Filling
Adapted from Sunday Baker

cup butter
cup flour
½ tsp. salt
¼ tsp. black pepper
½ tsp. onion powder
½ tsp. garlic powder
14 oz. can vegetable broth
⅔ cup milk
2 cups frozen mixed vegetable blend, thawed
15 oz. can whole new potatoes, drained and cubed
6 oz. jar whole mushrooms, drained and halved (quartered if large)

Melt the butter in a saucepan. Stir in the flour, salt, and spices until blended. Cook for several minutes, then slowly stir in vegetable broth and milk. Cook over medium-low heat until thickened. Stir in vegetables, potatoes, and mushrooms.  Cook until heated through.  Use to fill pie crusts before baking, or serve with biscuits.